<?xml version="1.0" encoding="utf-8"?><feed xmlns="http://www.w3.org/2005/Atom" xml:lang="en"><generator uri="https://jekyllrb.com/" version="3.10.0">Jekyll</generator><link href="https://jexpnimesh.com/feed.xml" rel="self" type="application/atom+xml" /><link href="https://jexpnimesh.com/" rel="alternate" type="text/html" hreflang="en" /><updated>2026-11-17T13:46:12+00:00</updated><id>https://jexpnimesh.com/feed.xml</id><title type="html">Nimesh Chahare</title><subtitle>Nimesh Chahare is a postdoctoral fellow in the Stuart group at EMBL Barcelona, asking how mechanics guides stem cells as they self-organize into a neural tube. He trained as a mechanical engineer in material science, and works at the intersection of tissue mechanics and developmental biology.</subtitle><author><name>Nimesh Chahare</name></author><entry><title type="html">Git: How to push and reset github token</title><link href="https://jexpnimesh.com/2024/08/31/push-git.html" rel="alternate" type="text/html" title="Git: How to push and reset github token" /><published>2024-08-31T00:00:00+00:00</published><updated>2024-08-31T00:00:00+00:00</updated><id>https://jexpnimesh.com/2024/08/31/push-git</id><content type="html" xml:base="https://jexpnimesh.com/2024/08/31/push-git.html"><![CDATA[<p>I can’t believe that every 3 months, I forget how to do this.</p>

<p>Here’s how to make the <code class="language-plaintext highlighter-rouge">git push</code> command work for pushing an existing folder/repository from the command line:</p>

<h3 id="step-by-step-process">Step-by-step process:</h3>

<ul>
  <li>Ensure you have initialized your local repository: <code class="language-plaintext highlighter-rouge">git init</code></li>
  <li>Add the remote repository: <code class="language-plaintext highlighter-rouge">git remote add origin &lt;url_of_remote_repository&gt;</code></li>
  <li>Here you must recall that it <code class="language-plaintext highlighter-rouge">&lt;url_of_remote_repository&gt;</code> is typically in following format:  <code class="language-plaintext highlighter-rouge">https://&lt;PERSONAL_ACCESS_TOKEN&gt;@github.com/&lt;username&gt;/&lt;username&gt;.github.io.git</code></li>
  <li>You can get a classic token from developer’s settings in your github page. Tick all the necessary permission boxes. I typically copy paste this code in secure location for future use.</li>
  <li>Add files, commit and push</li>
</ul>

<pre><code class="language-git">git add .
git commit -m "Initial Commit"
git remote -v
git push origin master
</code></pre>

<h3 id="how-to-reset-token">How to reset token</h3>

<ul>
  <li>If you already had done the above part but now the token has expired.</li>
  <li>Open terminal in vscode, if you are using vscode to commit and push code.</li>
  <li>Check if all the information is correct by using this command <code class="language-plaintext highlighter-rouge">git config --list</code></li>
  <li>Most likely, the token is wrong. So you can set it up again using <code class="language-plaintext highlighter-rouge">git remote set-url origin https://&lt;PERSONAL_ACCESS_TOKEN&gt;@github.com/&lt;username&gt;/&lt;repo&gt;.git</code></li>
</ul>]]></content><author><name>Nimesh Chahare</name></author><summary type="html"><![CDATA[I can’t believe that every 3 months, I forget how to do this.]]></summary></entry><entry><title type="html">Transcribing audio with Faster whisper</title><link href="https://jexpnimesh.com/2024/07/30/faster-whisper.html" rel="alternate" type="text/html" title="Transcribing audio with Faster whisper" /><published>2024-07-30T00:00:00+00:00</published><updated>2024-07-30T00:00:00+00:00</updated><id>https://jexpnimesh.com/2024/07/30/faster-whisper</id><content type="html" xml:base="https://jexpnimesh.com/2024/07/30/faster-whisper.html"><![CDATA[<h1 id="how-to-use-faster-whisper">How to use faster-whisper</h1>

<p>It is incredibly easy to install and run. After exploring many options both online and offline, I found this app that allows you to transcribe audio with fairly good accuracy. The time it takes to transcribe is roughly the same as the duration of the audio.</p>

<p>Additionally, it is free, unlike OpenAI Whisper, which requires payment. Here, you only spend time on computation, and I am fine with that.</p>

<p>Having a GPU might have been beneficial, but it is not feasible for me due to my laptop. It’s unfortunate.</p>

<h1 id="installation">Installation</h1>

<p>Fairly straightforward. Just follow the instructions from the <a href="https://github.com/SYSTRAN/faster-whisper">github repo</a>. It is just start your own virtual environment and run pip.</p>

<div class="language-python highlighter-rouge"><div class="highlight"><pre class="highlight"><code><span class="n">python</span> <span class="o">-</span><span class="n">m</span> <span class="n">venv</span> <span class="n">myenv</span>  <span class="c1"># Create a new virtual environment
</span><span class="p">.</span>\<span class="n">myenv</span>\<span class="nb">bin</span>\<span class="n">activate</span>  <span class="c1"># Activate the virtual environment
</span><span class="n">pip</span> <span class="n">install</span> <span class="n">faster</span><span class="o">-</span><span class="n">whisper</span> <span class="c1"># install github
</span></code></pre></div></div>

<h2 id="usage">Usage</h2>

<p>I copy pasted following script to a jupyter notebook</p>

<div class="language-python highlighter-rouge"><div class="highlight"><pre class="highlight"><code><span class="kn">from</span> <span class="nn">faster_whisper</span> <span class="kn">import</span> <span class="n">WhisperModel</span>

<span class="n">model_size</span> <span class="o">=</span> <span class="s">"distil-large-v3"</span>

<span class="n">model</span> <span class="o">=</span> <span class="n">WhisperModel</span><span class="p">(</span><span class="n">model_size</span><span class="p">,</span> <span class="n">device</span><span class="o">=</span><span class="s">"cpu"</span><span class="p">,</span> <span class="n">compute_type</span><span class="o">=</span><span class="s">"int8"</span><span class="p">)</span>

<span class="n">segments</span><span class="p">,</span> <span class="n">info</span> <span class="o">=</span> <span class="n">model</span><span class="p">.</span><span class="n">transcribe</span><span class="p">(</span><span class="s">"yesterweb.m4a"</span><span class="p">,</span> <span class="n">beam_size</span><span class="o">=</span><span class="mi">5</span><span class="p">,</span> <span class="n">language</span><span class="o">=</span><span class="s">"en"</span><span class="p">,</span> <span class="n">condition_on_previous_text</span><span class="o">=</span><span class="bp">False</span><span class="p">,</span> <span class="n">vad_filter</span><span class="o">=</span><span class="bp">True</span><span class="p">)</span>

<span class="k">print</span><span class="p">(</span><span class="s">"Detected language '%s' with probability %f"</span> <span class="o">%</span> <span class="p">(</span><span class="n">info</span><span class="p">.</span><span class="n">language</span><span class="p">,</span> <span class="n">info</span><span class="p">.</span><span class="n">language_probability</span><span class="p">))</span>

<span class="k">for</span> <span class="n">segment</span> <span class="ow">in</span> <span class="n">segments</span><span class="p">:</span>
    <span class="k">print</span><span class="p">(</span><span class="s">"[%.2fs -&gt; %.2fs] %s"</span> <span class="o">%</span> <span class="p">(</span><span class="n">segment</span><span class="p">.</span><span class="n">start</span><span class="p">,</span> <span class="n">segment</span><span class="p">.</span><span class="n">end</span><span class="p">,</span> <span class="n">segment</span><span class="p">.</span><span class="n">text</span><span class="p">))</span>
</code></pre></div></div>

<p>I found <code class="language-plaintext highlighter-rouge">distill-large-v3</code> is better than <code class="language-plaintext highlighter-rouge">large-v3</code>. It takes roughly same amount of time to run as the audio.</p>

<p>Results are with the timestamps you can easily get rid of them by changing last line.</p>

<div class="language-python highlighter-rouge"><div class="highlight"><pre class="highlight"><code>    <span class="k">print</span><span class="p">(</span><span class="s">"%s"</span> <span class="o">%</span> <span class="p">(</span><span class="n">segment</span><span class="p">.</span><span class="n">text</span><span class="p">))</span>
</code></pre></div></div>

<p>There is also a possibility of moving text directly in a text file.</p>

<div class="language-python highlighter-rouge"><div class="highlight"><pre class="highlight"><code><span class="k">with</span> <span class="nb">open</span><span class="p">(</span><span class="sa">f</span><span class="s">"mluther.txt"</span><span class="p">,</span> <span class="s">"w"</span><span class="p">)</span> <span class="k">as</span> <span class="nb">file</span><span class="p">:</span>
        <span class="k">for</span> <span class="n">segment</span> <span class="ow">in</span> <span class="n">segments</span><span class="p">:</span>
            <span class="nb">file</span><span class="p">.</span><span class="n">write</span><span class="p">(</span><span class="sa">f</span><span class="s">"</span><span class="si">{</span><span class="n">segment</span><span class="p">.</span><span class="n">text</span><span class="si">}</span><span class="se">\n</span><span class="s">"</span><span class="p">)</span>
</code></pre></div></div>

<p>I will use the following script in the future.</p>

<div class="language-python highlighter-rouge"><div class="highlight"><pre class="highlight"><code><span class="kn">from</span> <span class="nn">faster_whisper</span> <span class="kn">import</span> <span class="n">WhisperModel</span>
<span class="kn">import</span> <span class="nn">os</span>


<span class="n">filename</span> <span class="o">=</span> <span class="s">"mluther.mp3"</span>
<span class="n">base_filename</span> <span class="o">=</span> <span class="n">os</span><span class="p">.</span><span class="n">path</span><span class="p">.</span><span class="n">splitext</span><span class="p">(</span><span class="n">os</span><span class="p">.</span><span class="n">path</span><span class="p">.</span><span class="n">basename</span><span class="p">(</span><span class="n">filename</span><span class="p">))[</span><span class="mi">0</span><span class="p">]</span>

<span class="n">model_size</span> <span class="o">=</span> <span class="s">"distil-large-v3"</span>
<span class="n">model</span> <span class="o">=</span> <span class="n">WhisperModel</span><span class="p">(</span><span class="n">model_size</span><span class="p">,</span> <span class="n">device</span><span class="o">=</span><span class="s">"cpu"</span><span class="p">,</span> <span class="n">compute_type</span><span class="o">=</span><span class="s">"int8"</span><span class="p">)</span>

<span class="n">segments</span><span class="p">,</span> <span class="n">info</span> <span class="o">=</span> <span class="n">model</span><span class="p">.</span><span class="n">transcribe</span><span class="p">(</span><span class="n">filename</span><span class="p">,</span> <span class="n">beam_size</span><span class="o">=</span><span class="mi">5</span><span class="p">,</span> <span class="n">language</span><span class="o">=</span><span class="s">"en"</span><span class="p">,</span> <span class="n">condition_on_previous_text</span><span class="o">=</span><span class="bp">False</span><span class="p">,</span> <span class="n">vad_filter</span><span class="o">=</span><span class="bp">True</span><span class="p">)</span>
<span class="k">print</span><span class="p">(</span><span class="s">"Detected language '%s' with probability %f"</span> <span class="o">%</span> <span class="p">(</span><span class="n">info</span><span class="p">.</span><span class="n">language</span><span class="p">,</span> <span class="n">info</span><span class="p">.</span><span class="n">language_probability</span><span class="p">))</span>

<span class="k">with</span> <span class="nb">open</span><span class="p">(</span><span class="sa">f</span><span class="s">"</span><span class="si">{</span><span class="n">base_filename</span><span class="si">}</span><span class="s">.txt"</span><span class="p">,</span> <span class="s">"w"</span><span class="p">)</span> <span class="k">as</span> <span class="nb">file</span><span class="p">:</span>
        <span class="k">for</span> <span class="n">segment</span> <span class="ow">in</span> <span class="n">segments</span><span class="p">:</span>
            <span class="nb">file</span><span class="p">.</span><span class="n">write</span><span class="p">(</span><span class="sa">f</span><span class="s">"</span><span class="si">{</span><span class="n">segment</span><span class="p">.</span><span class="n">text</span><span class="si">}</span><span class="se">\n</span><span class="s">"</span><span class="p">)</span>
            
<span class="k">print</span><span class="p">(</span><span class="s">"Done"</span><span class="p">)</span>
</code></pre></div></div>

<h1 id="future">Future</h1>

<p>It would be beneficial to learn about another application that is based on faster-whisper but supports word-to-word editing. I came across <a href="https://github.com/geekodour/wscribe">this one</a>, which can generate a JSON file for transcripts, allowing for a word-to-word comparison between audio and transcript. This feature is helpful for correcting errors.</p>

<p>I believe this tool would be very useful for recording my voice notes. I will need to use a program to sift through the rambling. However, I think it’s a great idea.</p>]]></content><author><name>Nimesh Chahare</name></author><category term="resources" /><summary type="html"><![CDATA[How to use faster-whisper]]></summary></entry><entry><title type="html">FFmpeg: changing aspect ratio</title><link href="https://jexpnimesh.com/2024/06/05/ffmpeg-crop.html" rel="alternate" type="text/html" title="FFmpeg: changing aspect ratio" /><published>2024-06-05T00:00:00+00:00</published><updated>2024-06-05T00:00:00+00:00</updated><id>https://jexpnimesh.com/2024/06/05/ffmpeg-crop</id><content type="html" xml:base="https://jexpnimesh.com/2024/06/05/ffmpeg-crop.html"><![CDATA[<p>Twitter has specific requirements for video dimensions. It’s essential to have a reasonable aspect ratio like 16:9 or 4:3, and the platform doesn’t allow odd numbers of pixels in the width or height. It’s also recommended to upload MP4 files for better compatibility.</p>

<p><strong>Step 1: Install FFmpeg on Windows</strong></p>

<ol>
  <li>Open your command prompt.</li>
  <li>Type <code class="language-plaintext highlighter-rouge">winget install ffmpeg</code> and press enter.</li>
  <li>Say yes to all prompts and restart the terminal when installation is complete.</li>
</ol>

<p><strong>Method 1: Padding</strong></p>

<p>Padding involves adding black bars to the height of your video to meet Twitter’s aspect ratio requirements. Here’s how to do it:</p>

<ol>
  <li>Calculate the padding pixels. If your video’s width (<code class="language-plaintext highlighter-rouge">iw</code>) is 680 and the height (<code class="language-plaintext highlighter-rouge">ih</code>) is 480 (4:3 aspect ratio), the <code class="language-plaintext highlighter-rouge">padding</code> would be <code class="language-plaintext highlighter-rouge">((680*3 - 480*4)/8)</code>.</li>
  <li>
    <p>Use the following FFmpeg command for padding:</p>

    <p><code class="language-plaintext highlighter-rouge">ffmpeg -i input.mp4 -vf "pad=width=iw:height=ih+padding:x=0:y=padding/2:color=black" -c:a copy output.mp4</code></p>

    <p>Replace <code class="language-plaintext highlighter-rouge">padding</code> with your calculated value.</p>
  </li>
</ol>

<p><strong>Method 2: Cropping</strong></p>

<p>Cropping is a simpler method where you remove parts of the video to meet the aspect ratio. Here’s how:</p>

<ol>
  <li>Determine the crop width, crop height, x, and y values.</li>
  <li>
    <p>Use the following FFmpeg command for cropping:</p>

    <p><code class="language-plaintext highlighter-rouge">ffmpeg -i input.mp4 -vf "crop=cw:ch:x:y" output.mp4</code></p>

    <p>Replace <code class="language-plaintext highlighter-rouge">cw</code>, <code class="language-plaintext highlighter-rouge">ch</code>, <code class="language-plaintext highlighter-rouge">x</code>, and <code class="language-plaintext highlighter-rouge">y</code> with your values.</p>
  </li>
</ol>

<p>If you don’t specify <code class="language-plaintext highlighter-rouge">x</code> and <code class="language-plaintext highlighter-rouge">y</code> then it will crop from the center.</p>

<p><strong>Convert avi to mp4</strong></p>

<p>If you need to convert avi to mp4 use following command</p>

<p><code class="language-plaintext highlighter-rouge">ffmpeg -i input.avi output.mp4</code></p>

<p><strong>References</strong></p>

<ul>
  <li>You can learn many FFmpeg commands through this webapp https://ffmpeg.lav.io/</li>
  <li>Also, actual documentation: https://www.ffmpeg.org/ffmpeg.html</li>
</ul>]]></content><author><name>Nimesh Chahare</name></author><summary type="html"><![CDATA[Twitter has specific requirements for video dimensions. It’s essential to have a reasonable aspect ratio like 16:9 or 4:3, and the platform doesn’t allow odd numbers of pixels in the width or height. It’s also recommended to upload MP4 files for better compatibility.]]></summary></entry><entry><title type="html">Get a NFC business card, now!</title><link href="https://jexpnimesh.com/2024/03/17/nfc-card.html" rel="alternate" type="text/html" title="Get a NFC business card, now!" /><published>2024-03-17T00:00:00+00:00</published><updated>2024-03-17T00:00:00+00:00</updated><id>https://jexpnimesh.com/2024/03/17/nfc-card</id><content type="html" xml:base="https://jexpnimesh.com/2024/03/17/nfc-card.html"><![CDATA[<p>I am now a serious man with a PhD, and like every serious man, I need a serious business card. However, in the 2020s, very few people ask for or expect to receive a business card. This is where I got the idea for an NFC business card, which allows you to share all your contact details by simply touching the card with an NFC-enabled phone. Therefore, for this birthday, I requested a set of NFC cards as a present from my partner.</p>

<p>There are services and scammers that offer professional NFC cards, where you can pay 15 EUR for a <a href="https://amzn.eu/d/hFboGpU">pre-made card</a> with your contact details. However, I chose to spend time making the cards myself to gain experience with this technology.</p>

<p>I discovered that these cards can be programmed for various functions. I found a <a href="https://amzn.eu/d/0JTDZwO">set of ten cards</a> online for less than 10 EUR.</p>

<p>The technology involves rechargeable NFC 215 cards, which we can program and reprogram multiple times. I just need to use the <a href="https://play.google.com/store/apps/details?id=com.wakdev.wdnfc&amp;pcampaignid=web_share">NFC tools</a> app for reading and writing to the card. It offers many options, from text to contacts, and can even be used for programming Wi-Fi and Bluetooth connections.</p>

<p>I attempted to connect a link to my website, and it works!</p>

<p>However, I was not satisfied with the website because it is not designed for quick contact. It is intended for people to learn about me as a professional scientist. I wanted to create a landing page that allows interested individuals to reach me directly through actionable links, such as sending me an email or following me on Twitter/X.</p>

<h2 id="creating-the-perfect-landing-page">Creating the Perfect Landing Page</h2>

<p>When it comes to sharing links, we often turn to popular platforms like Linktree or Linkinbio. However, I’ve never been a fan of these options because they all look the same and lack that personal touch I want to convey. That’s when I discovered <a href="https://mmm.page/">mmm.page</a>. I absolutely love its philosophy: it views the internet as a canvas, and you, the artist, are free to paint or embed dynamic content as you wish. It’s like creating back-of-napkin notes but in a digital format.</p>

<p>Using this platform, I crafted my own unique landing page at <a href="https://nimesh.mmm.page/">nimesh.mmm.page</a>, and I must say, it’s way more fun than any of those typical link-in-bio pages. My page features a brief bio, adorned with a delightful mix of GIFs, including Newton and Curie, along with a chicken and a microscope. It’s a quirky representation of me that stands out from the crowd!</p>

<h2 id="special-links">Special links</h2>

<p>One of the standout features of this landing page, in my opinion, is the ability to create links. The email link, for instance, drafts an email directly from your phone to me, complete with a pre-filled subject and body text. Check out the following hyperlink:</p>

<div class="language-html highlighter-rouge"><div class="highlight"><pre class="highlight"><code>href="mailto:YOURMAIL?subject=Hello!<span class="err">&amp;</span>body=we%20just%20met.%20lets%20stay%20in%20touch"
</code></pre></div></div>

<p>The Twitter link directs you to my profile and allows you to follow me.</p>

<div class="language-html highlighter-rouge"><div class="highlight"><pre class="highlight"><code>https://twitter.com/intent/user?screen_name=onenimesa
</code></pre></div></div>

<p>You can also text me on WhatsApp, which functions similarly. You can find this link in your profile section, where you can share the contact as a QR code.</p>

<p>Ultimately, the phone number part is quite simple.</p>

<div class="language-html highlighter-rouge"><div class="highlight"><pre class="highlight"><code>tel:XXXXXXXXX
</code></pre></div></div>

<h2 id="conclusion">Conclusion</h2>

<p>It was a pleasant experience creating NFC business cards. I am very pleased to have learned how to design an attractive landing page with actionable links.</p>

<p>However, the card still appears somewhat unappealing since it is merely a plain white card. In the future, I could design a card and print a sticker to place on top of it. For now, I have chosen to use a Sharpie to write down my details, which doesn’t look too bad. In the future, I will include a QR code for those who do not have NFC.</p>]]></content><author><name>Nimesh Chahare</name></author><summary type="html"><![CDATA[I am now a serious man with a PhD, and like every serious man, I need a serious business card. However, in the 2020s, very few people ask for or expect to receive a business card. This is where I got the idea for an NFC business card, which allows you to share all your contact details by simply touching the card with an NFC-enabled phone. Therefore, for this birthday, I requested a set of NFC cards as a present from my partner.]]></summary></entry><entry><title type="html">Mixes are back. Bye! Bye! Spotify!</title><link href="https://jexpnimesh.com/2024/02/18/mixcloud.html" rel="alternate" type="text/html" title="Mixes are back. Bye! Bye! Spotify!" /><published>2024-02-18T00:00:00+00:00</published><updated>2024-02-18T00:00:00+00:00</updated><id>https://jexpnimesh.com/2024/02/18/mixcloud</id><content type="html" xml:base="https://jexpnimesh.com/2024/02/18/mixcloud.html"><![CDATA[<p>As I write this, I am listening to a <a href="https://www.youtube.com/watch?v=4nvewes8Inc">live DJ vinyl set</a>. By the end of 2023, it became clear that my Spotify family was over. I do not like Spotify and the large corporations in the music industry, so it made no sense to continue paying for it. The new year is meant to be more private and more free.</p>

<p>This was the time I reevaluated my music tastes. Typically, I listen to music in phases. I realized that I lack a distinct personality; I get my music from others. Then I found that no one really has a unique personality; everyone gets their music from someone they know, either in real life or online.</p>

<p>Until 2019, most of the music I listened to was stored on my hard drive. I owned my music, however I might have obtained it; it was mine.</p>

<p>These days, I do not have any app to listen to music with. I found some apps that are alternative frontends for YouTube Music, but I wanted something different. I prefer to listen to music passively, without knowing what song is playing or what the lyrics are. I just want to enjoy the vibes.</p>

<p>A couple of years ago, I saw a poster for the Common People party in Barcelona, where DJ Amable was playing all the hits from the 90s and 2000s. I feel there is a special place for indie music in my heart. On the website, I found a link to a Mixcloud mix of DJ Amable’s live DJ set, which is what I have returned to.</p>

<p>I am listening to a live DJ set. There are thousands of these videos, whatever your jam is. I do not even care about the musicians or the lyrics. There is no one I am trying to impress; I just want time to pass and my work to continue.</p>

<p>On Spotify, I would regularly play robot-made mixes, but there was never the flow I needed. It feels good to have a professional selecting the music for me and making it flow, whatever I need.</p>

<p>I love “My Analog Journal,” where someone plays vinyl tracks and enjoys themselves. That is what I desire; I want to be partying to sweet beats, whether they are Bollywood disco or post-punk rock. There are more channels like this one. Let YouTube recommendations do their job. I believe I have discovered newer genres that would have been difficult to find otherwise.</p>

<p>YouTube channels:</p>
<ul>
  <li>Mild Mambo Club</li>
  <li>Book Club Radio</li>
  <li>My Analog Journal</li>
  <li>Before Sunset Sessions</li>
  <li>Humano Studios</li>
</ul>

<p>I am listening to shows like “How Does It Feel to Be Loved” or “Pop Songs Your New Boyfriend Is Too Stupid to Know About.” There is a certain pleasure in enjoying music that I do not control at all. I am discovering new things, and it feels like I am back in the 2010s, where radio was my main source of music. I still have an alternative YouTube Music frontend to listen to the specific music I want.</p>

<p>Mixcloud shows</p>
<ul>
  <li>PopSongsMixtape</li>
  <li>How Does It Feel To Be Loved?</li>
  <li>DJ Monami</li>
  <li>amable</li>
</ul>

<p>I feel sad that the days of owning music (digitally) are over. I am simply enjoying whatever is available and seeing how life unfolds. I still keep my hard drive of music. And keep adding more to it you never know how long this lasts.</p>]]></content><author><name>Nimesh Chahare</name></author><summary type="html"><![CDATA[As I write this, I am listening to a live DJ vinyl set. By the end of 2023, it became clear that my Spotify family was over. I do not like Spotify and the large corporations in the music industry, so it made no sense to continue paying for it. The new year is meant to be more private and more free.]]></summary></entry><entry><title type="html">Correbraves!!!</title><link href="https://jexpnimesh.com/2024/01/21/correbraves.html" rel="alternate" type="text/html" title="Correbraves!!!" /><published>2024-01-21T00:00:00+00:00</published><updated>2024-01-21T00:00:00+00:00</updated><id>https://jexpnimesh.com/2024/01/21/correbraves</id><content type="html" xml:base="https://jexpnimesh.com/2024/01/21/correbraves.html"><![CDATA[<p>Pub crawls, bar tours, or the delightful practice of “bap-hopping” are quite common, and perhaps it’s a European thing. There’s something undeniably fun about roaming the city with friends and indulging in a few drinks. I’ve experienced it myself, often focusing on the culinary side of things. Take my ‘ruta del sants,’ for instance: it started with beers after work at Centre Cívic Can Deu, followed by a stroll to another bar for some delicious patates montreal paired with a pint of Budvar. Then, we’d continue our walk to Plaça d’Osca for a proper dinner, which might lead us to cocktails or shots of ratafia. I cherish so many beautiful memories of this city, and it’s bittersweet to think I’ll be leaving it soon. I will really miss my friends and the vibes of Barcelona.</p>

<p>It’s already been a few years since I moved to Sant Gervasi, a neighborhood in Barcelona known for many things, but what I found incredible is that the local bars serve some of the best bravas in the city. They’ve been winning awards year after year! I’ve also noticed that people are indulging in “corretapas,” where you hop from bar to bar trying different tapas—similar to bar-hopping but with a focus on delicious bites.</p>

<p>This inspired me to create a “<strong>correbraves</strong>,” where I organized a route of bars that have won awards for the best bravas or have been featured in newspapers for their exceptional offerings. I shared the idea over lunch, and it quickly gained traction! As a group, we decided on the following must-visit spots:</p>

<ol>
  <li>Bar Tomás de Sarrià</li>
  <li>Bar Marcel Santalo</li>
  <li>Bar Omar</li>
  <li>Wherever the night takes us!</li>
</ol>

<p>Let the adventure begin!</p>

<h3 id="bar-tomás-de-sarrià">Bar Tomás de Sarrià</h3>

<p>We kicked off our evening at Bar Tomás with a large group, and let me tell you, arriving early is key! The weather was less than ideal—rainy and dreary—but we trudged our way from the lab. Upon arrival, we faced the quintessential Barcelona dilemma: finding enough seats for a big group at a popular bar. It’s quite the hassle, but we managed to snag a table for eight to ten people. We indulged in patatas bravas and beers, and I have to say, this place is my favorite! It boasts that classic old Catalan neighborhood bar vibe, complete with a grumpy waiter. The sauce was delicious, and the bravas were perfectly crispy on the outside and fluffy on the inside. This gem has been making headlines, and I can see why—it truly deserves all the accolades! After our feast, we hopped on the FGC train to our next destination, Muntaner.</p>

<h3 id="bar-marcel-santalo">Bar Marcel Santalo</h3>

<p>By the time we reached Bar Marcel Santalo, the rain had intensified, and after 8 PM, finding a spot was nearly impossible. We lost a few folks along the way, but our adventure continued. As expected, the bar was packed, so we decided to grab some takeout bravas and head to my place since I literally lived just across the street. Everyone piled into my home, and I handed out forks—thankfully, I had just enough! Some found the takeout experience a bit underwhelming, but I enjoyed it. Sure, it wasn’t the same as dining in, and the sauces ended up all over the place, but the best part was at the bottom of the container. Just when it seemed like we might call it a night, the enthusiasm kicked in, and we decided to push forward!</p>

<h3 id="bar-omar">Bar Omar</h3>

<p>Next up was Bar Omar, another spot known for its accolades and a reputation as a fancier restaurant. We knew it would be a tight squeeze for our group, but we gave it a shot anyway. We asked the waiter if we could eat standing outside, and placed our order for the exquisite bravas from Sant Gervasi. The waiter brought us small plates of bravas drizzled with sauce, featuring a flame-kissed butifarra. They were absolutely incredible! I was thrilled we could experience this. It was unanimously decided that Bar Omar had the best bravas around. The rain had let up, and despite losing a few more people, our motivation for some real food kept us going.</p>

<h3 id="not-bravas-at-byblos">Not Bravas at Byblos</h3>

<p>I then led the group to our next neighborhood favorite, Byblos. They serve the best Lebanese shawarma in Barcelona, and it’s super affordable—just what we needed! We grabbed more beers, more food, and even some delightful Middle Eastern sweets. Nights like these, where you never know where you’ll end up, are absolutely amazing!</p>

<h3 id="conclusion-at-bar-la-cava">Conclusion at Bar La Cava</h3>

<p>I truly love this neighborhood, even if it has a reputation for being upscale and catering to the wealthy. There are plenty of cool bars and restaurants that won’t break the bank. I had my heart set on a jugatería, but when we arrived, people were hesitant to go in, thinking it was just for teenagers and not suitable for us. So, I shrugged it off and suggested another spot. We ended up at Bar La Cava, a place known for being perpetually closed, but it was open that night! We enjoyed 5-euro cocktails and had two fantastic bartenders serving us. Amid great conversations and full bellies, we wrapped up the night, already excited about planning more adventures like this in the future.</p>]]></content><author><name>Nimesh Chahare</name></author><summary type="html"><![CDATA[Pub crawls, bar tours, or the delightful practice of “bap-hopping” are quite common, and perhaps it’s a European thing. There’s something undeniably fun about roaming the city with friends and indulging in a few drinks. I’ve experienced it myself, often focusing on the culinary side of things. Take my ‘ruta del sants,’ for instance: it started with beers after work at Centre Cívic Can Deu, followed by a stroll to another bar for some delicious patates montreal paired with a pint of Budvar. Then, we’d continue our walk to Plaça d’Osca for a proper dinner, which might lead us to cocktails or shots of ratafia. I cherish so many beautiful memories of this city, and it’s bittersweet to think I’ll be leaving it soon. I will really miss my friends and the vibes of Barcelona.]]></summary></entry><entry><title type="html">Syncthing: Freedom from Google Photos</title><link href="https://jexpnimesh.com/2024/01/06/syncthing.html" rel="alternate" type="text/html" title="Syncthing: Freedom from Google Photos" /><published>2024-01-06T00:00:00+00:00</published><updated>2024-01-06T00:00:00+00:00</updated><id>https://jexpnimesh.com/2024/01/06/syncthing</id><content type="html" xml:base="https://jexpnimesh.com/2024/01/06/syncthing.html"><![CDATA[<p>At the moment of deciding to get rid of my Google storage, I needed a way to have all my files synced together. Google offered 15 GB or something similar. I could have it synced across all my devices, but I am not interested in that. I want nothing to do with Google, OneDrive, or Dropbox.</p>

<p>This is when I discovered Syncthing. It’s quite impressive. It is a peer-to-peer file-sharing system that allows you to share files between your devices. Modern devices come with hundreds of GB of memory, so whatever folder you want to sync between devices, like your camera folder, can be synced across them. It works over Wi-Fi or any other connection. The only requirement is that both devices need to be on and connected to the internet.</p>

<p>I use this to sync my notes, photos, and all other important items across devices, and the only limitation is your internal memory.</p>

<p>It is not perfect. I have noticed certain issues, such as the version control being annoying. Additionally, sometimes the app is not running, which prevents my files from syncing. Therefore, ensure that all of these things are active and enjoy freedom from Google.</p>

<h2 id="how-to-use">How to use</h2>

<p>Simply download it from their <a href="https://syncthing.net/downloads/">website</a>. Read this <a href="https://www.pcworld.com/article/2048298/how-to-use-syncthing-to-sync-files-without-the-cloud.html">article</a>, and you are all set. It’s amazing.</p>]]></content><author><name>Nimesh Chahare</name></author><category term="resources" /><summary type="html"><![CDATA[At the moment of deciding to get rid of my Google storage, I needed a way to have all my files synced together. Google offered 15 GB or something similar. I could have it synced across all my devices, but I am not interested in that. I want nothing to do with Google, OneDrive, or Dropbox.]]></summary></entry><entry><title type="html">Combining sudo apt update+upgrade</title><link href="https://jexpnimesh.com/2023/12/14/nimupdate.html" rel="alternate" type="text/html" title="Combining sudo apt update+upgrade" /><published>2023-12-14T00:00:00+00:00</published><updated>2023-12-14T00:00:00+00:00</updated><id>https://jexpnimesh.com/2023/12/14/nimupdate</id><content type="html" xml:base="https://jexpnimesh.com/2023/12/14/nimupdate.html"><![CDATA[<p>I am not a frequent Ubuntu user, but I use it enough to find it frustrating to repeatedly type <code class="language-plaintext highlighter-rouge">sudo apt update</code>, enter my password, and then type <code class="language-plaintext highlighter-rouge">sudo apt upgrade</code>. I thought I was the only one who felt this way, but it turns out many others share this annoyance, and there is a simple solution to address it.</p>

<p>We can create an alias for a set of commands in the <code class="language-plaintext highlighter-rouge">.bashrc</code> file, and the computer will remember it.</p>

<h2 id="how-i-created-nimupdate">How I created <code class="language-plaintext highlighter-rouge">nimupdate</code></h2>

<p>This is the alias we will use:</p>

<div class="language-plaintext highlighter-rouge"><div class="highlight"><pre class="highlight"><code># Custom alias for updating system
nimupdate() {
    echo "Starting system update..."
    sudo apt update &amp;&amp; sudo apt upgrade -y
    echo "System update completed."
}
</code></pre></div></div>

<p>Next, add this to the <code class="language-plaintext highlighter-rouge">.bashrc</code> file.</p>

<p>Follow these steps:</p>
<ul>
  <li>Open the terminal.</li>
  <li>Type <code class="language-plaintext highlighter-rouge">nano ~/.bashrc</code>.</li>
  <li>Scroll down to the end and paste the command by right-clicking.</li>
  <li>To save, press <code class="language-plaintext highlighter-rouge">Ctrl + X</code>.</li>
  <li>Exit the nano editor.</li>
  <li>Type <code class="language-plaintext highlighter-rouge">source ~/.bashrc</code>.</li>
  <li>Restart the terminal for the command to take effect.</li>
  <li>Try using <code class="language-plaintext highlighter-rouge">nimupdate</code>. It will prompt for your password, and then it should work.</li>
</ul>]]></content><author><name>Nimesh Chahare</name></author><category term="resources" /><summary type="html"><![CDATA[I am not a frequent Ubuntu user, but I use it enough to find it frustrating to repeatedly type sudo apt update, enter my password, and then type sudo apt upgrade. I thought I was the only one who felt this way, but it turns out many others share this annoyance, and there is a simple solution to address it.]]></summary></entry><entry><title type="html">Blender: How to use Cad Sketcher</title><link href="https://jexpnimesh.com/2023/11/15/cad-sketcher.html" rel="alternate" type="text/html" title="Blender: How to use Cad Sketcher" /><published>2023-11-15T00:00:00+00:00</published><updated>2023-11-15T00:00:00+00:00</updated><id>https://jexpnimesh.com/2023/11/15/cad-sketcher</id><content type="html" xml:base="https://jexpnimesh.com/2023/11/15/cad-sketcher.html"><![CDATA[<h1 id="blender-how-to-use-cad-sketcher">Blender: How to use Cad Sketcher</h1>

<h2 id="introduction">Introduction</h2>

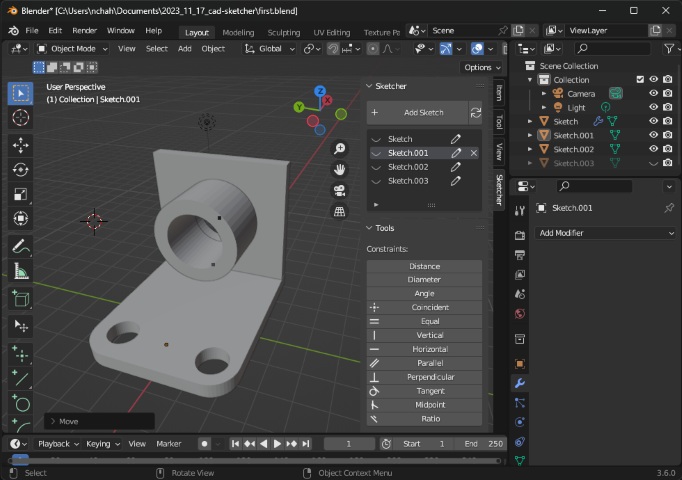
<p>CAD Sketcher, a fantastic tool that brings precise CAD-like functionalities into Blender for accurate modeling. This free and open-source add-on allows you to create 2D sketches defined by geometric constraints, convert them into editable meshes, and manipulate them using Blender’s geometry nodes and modifiers. It’s an awesome way to enhance your modeling workflow and create detailed designs. If you’re interested, I can guide you through the installation and basic steps to get started with CAD Sketcher in Blender!</p>

<div class="row justify-content-sm-center">
<figure>

  <picture>
    

    <!-- Fallback to the original file -->
    <img src="/assets/img/cadsketcher.jpg" class="img-fluid rounded z-depth-1" width="auto" height="auto" title=" " onerror="this.onerror=null; $('.responsive-img-srcset').remove();" />

  </picture>

</figure>

</div>

<h2 id="installing-cad-sketcher">Installing CAD sketcher</h2>

<ol>
  <li><strong>Accessing CAD Sketcher:</strong>
    <ul>
      <li>Visit the description section of the YouTube video where there’ll be a link to the official Gumroad page. <a href="https://makertales.gumroad.com/l/CADsketcher">plugin download link</a></li>
      <li>On the Gumroad page, you’ll find useful information. CAD Sketcher is entirely free, but if you wish to support the project, you can input an amount you’d like. If not, enter zero and click “I want this.”</li>
      <li>This will prompt a download of a zip file, which will be used for installation in Blender.</li>
    </ul>
  </li>
  <li><strong>Installation Process:</strong>
  To install CAD Sketcher in Blender, follow these steps:
    <ul>
      <li>Open Blender and navigate to Edit Preferences &gt; Add-ons.</li>
      <li>Click on the Install button within the Add-ons section.</li>
      <li>Locate the downloaded zip file and install the add-on.</li>
      <li>After installation, in the search bar, type “CAD.” CAD Sketcher will be listed there. You can tick it for enabling the plugin.</li>
      <li>Proceed to install a solver module. Click on “Install from pip” and wait for a moment. If any issues arise during installation, a warning message will appear, indicating a need to restart Blender.</li>
      <li>Restart the blender anyways.</li>
    </ul>
  </li>
  <li><strong>Adjusting Preferences (Optional):</strong>
 After successful installation, double-check the Preferences &gt; Add-ons section to ensure CAD Sketcher is installed correctly.
    <ul>
      <li>Adjust settings as per your preference. For instance:
        <ul>
          <li>Modify entity size (up to 3).</li>
          <li>Adjust text size (up to 45).</li>
          <li>Change decimal precision and angle precision to 1.</li>
          <li>Customize theme colors if desired (e.g., setting it to a preferred shade like blue).</li>
        </ul>
      </li>
      <li>Once adjustments are made, save the preferences.</li>
    </ul>
  </li>
</ol>

<h2 id="getting-started-with-cad-modeling-in-blender">Getting Started With CAD Modeling In Blender</h2>

<ol>
  <li><strong>Access Sketcher and Create a Sketch Surface:</strong>
    <ul>
      <li>Press ‘N’ to open the side menu in Blender. Or on the side, you can see a little arrow on the right.</li>
      <li>Look for a dropdown menu called “Sketcher” and select it.</li>
      <li>Click “Add Sketch” to create a new sketch. This action prompts various construction axis planes to appear, asking where you want to initiate the sketch. Choose a plane to start sketching on.</li>
    </ul>
  </li>
  <li><strong>Initiating Sketch and Applying Constraints:</strong>
    <ul>
      <li>Enter the selected sketch plane.</li>
      <li>Consider moving the 3D cursor temporarily using Shift and right-click to place it elsewhere. (if you want to, when you remove this you will see the small point).</li>
      <li>Notice the presence of a small point, indicating a solved 2D point within the sketch.</li>
    </ul>
  </li>
  <li><strong>Creating a Basic Shape (Cube in this case):</strong>
    <ul>
      <li>Use the rectangle tool to draw a shape by left-clicking and dragging.</li>
      <li>Horizontal and vertical constraints will automatically appear.</li>
      <li>To center the shape, use the line button to establish a construction line. Right-click to cancel the ongoing action.</li>
      <li>Convert the created line into a construction line.</li>
      <li>You can find the constraints in the sketcher sidebar, tools section. Press N to toggle the sidebar.</li>
      <li>Apply a midpoint constraint between the origin point and the construction line to center the shape.</li>
    </ul>
  </li>
  <li><strong>Adding Dimensions and Constraints:</strong>
    <ul>
      <li>Set dimensions by specifying distances between points (e.g., 5 millimeters) within the sketch. Using the constraint feature.</li>
      <li>Manipulate constraints by clicking and dragging to delete or manually deleting constraints within the sketch.</li>
    </ul>
  </li>
  <li><strong>Fully Constraining the Sketch:</strong>
    <ul>
      <li>Ensure all elements are equal to fully constrain the sketch.</li>
      <li>Utilize the converting options to turn the sketch into a mesh or a bezier. Opt for mesh conversion in this case.</li>
      <li>Click “Leave Sketch” once satisfied with the modifications made.</li>
    </ul>
  </li>
  <li><strong>Modifying the Resultant Mesh:</strong>
    <ul>
      <li>Select the newly created face within the mesh.</li>
      <li>Add a solidify modifier to the selected face, setting it to a specific dimension (e.g., 4 millimeters).</li>
      <li>Solidfy modifier works like a extrude tool.</li>
    </ul>
  </li>
  <li><strong>Editing the Sketch Post-Modification:</strong>
    <ul>
      <li>If desired, return to the sketch for further adjustments by clicking the pen icon.</li>
      <li>Change dimensions (e.g., altering from 5 millimeters to 2 millimeters) and observe the updates made in the mesh after leaving the sketch.</li>
      <li>Also, to draw on top of any surface, just add a workplane on that face. Sketch and solidify.</li>
    </ul>
  </li>
  <li><strong>How to extrude:</strong>
    <ul>
      <li>Different sketches are different objects. To connect them together, you have to join them.</li>
      <li>Select one object, then use boolean modifier and select union and in the object section select the other object.</li>
      <li>Once applying the modifier, you can delete the extra objects.</li>
    </ul>
  </li>
  <li><strong>How to cut:</strong>
    <ul>
      <li>It’s again to use same boolean modifier. Where you use the difference option</li>
    </ul>
  </li>
  <li><strong>Arraying</strong>
    <ul>
      <li>For doing repeated structures, make an object, apply array modifier.</li>
      <li>You can select an offset and the number of objects you have to repeat.</li>
      <li>You can make use of union or difference boolean operation.</li>
    </ul>
  </li>
  <li><strong>Export the file as stl</strong>
    <ul>
      <li>Always check that the modifiers are applied.</li>
      <li>Delete all the objects which are not in use.</li>
      <li>Check this in right panel: in scene collection. Only the object you care about should be there.</li>
      <li>Save the blend file.</li>
      <li>Then export the file as stl.</li>
    </ul>
  </li>
</ol>

<p>It is definitely not like solidworks. But I think it works more or less. And  most importantly it is free.</p>

<h2 id="references">References</h2>

<ul>
  <li><a href="https://www.youtube.com/watch?v=92QmjS-xDaI">https://www.youtube.com/watch?v=92QmjS-xDaI</a></li>
</ul>

<p>you can check this video for how to install cad sketcher</p>

<ul>
  <li><a href="https://youtu.be/1jNDLUDL0gc?si=uuMff0eHfWGecrSa">https://youtu.be/1jNDLUDL0gc?si=uuMff0eHfWGecrSa</a></li>
</ul>

<p>you have this video to learn shortcuts and how it really works.</p>]]></content><author><name>Nimesh Chahare</name></author><category term="resources" /><summary type="html"><![CDATA[Using Blender to install and master CAD Sketcher for precise 2D modeling and editable mesh creation.]]></summary></entry><entry><title type="html">Zotero: How to sync files</title><link href="https://jexpnimesh.com/2023/10/29/zoterosync.html" rel="alternate" type="text/html" title="Zotero: How to sync files" /><published>2023-10-29T00:00:00+00:00</published><updated>2023-10-29T00:00:00+00:00</updated><id>https://jexpnimesh.com/2023/10/29/zoterosync</id><content type="html" xml:base="https://jexpnimesh.com/2023/10/29/zoterosync.html"><![CDATA[<h1 id="how-to-sync-files-in-zotero">How to Sync Files in Zotero</h1>

<p>Zotero is a powerful reference management tool that allows you to organize and access your research materials with ease. While it primarily stores reference data, it’s important to understand that you can also sync files such as PDFs to your library. If you compare it with Mendeley, <strong>it only has 300MB of online storage</strong>. In this tutorial, we’ll show you how to effectively sync your Zotero library, including PDFs, across multiple devices.</p>

<h2 id="understanding-zoteros-data-and-files">Understanding Zotero’s Data and Files</h2>

<p>Before we dive into the syncing process, it’s crucial to differentiate between two core components of Zotero:</p>

<ol>
  <li><strong>Data</strong>: This includes reference information, notes, paper titles, and other metadata, but not PDFs.</li>
  <li><strong>Files</strong>: These are the PDFs and other attachments that you attach to your references.</li>
</ol>

<h2 id="default-zotero-syncing">Default Zotero Syncing</h2>

<p>By default, Zotero stores both data and files locally on your computer. However, Zotero offers a syncing feature that allows you to access your library on any computer with internet access.</p>

<h2 id="setting-up-zotero-sync">Setting Up Zotero Sync</h2>

<ol>
  <li>
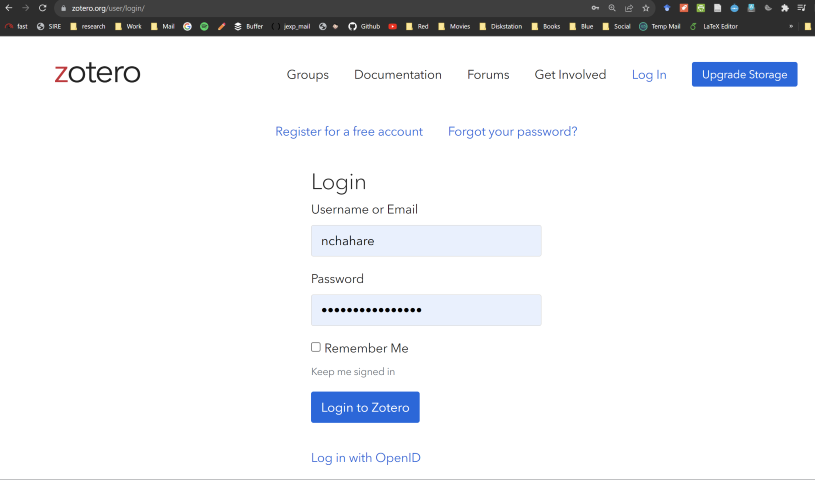
    <p><strong>Create a Zotero Account</strong>: If you don’t have one already, sign up for a Zotero account on their website.</p>
  </li>
  <li><strong>Access Sync Preferences</strong>:
    <ul>
      <li>Open Zotero and go to the top bar.</li>
      <li>Click on “Edit” and select “Preferences.”</li>
      <li>In the “Sync” section, you can enter your account information.</li>
    </ul>
  </li>
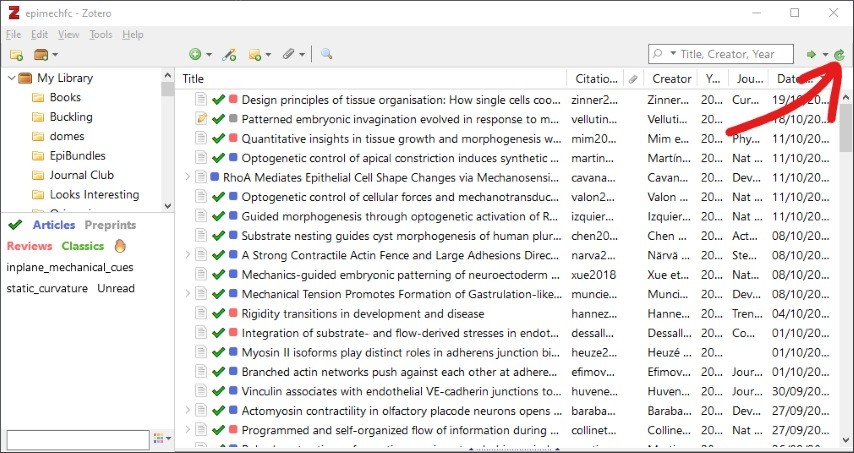
  <li><strong>Initiate Sync</strong>:
    <ul>
      <li>After adding multiple references in the library</li>
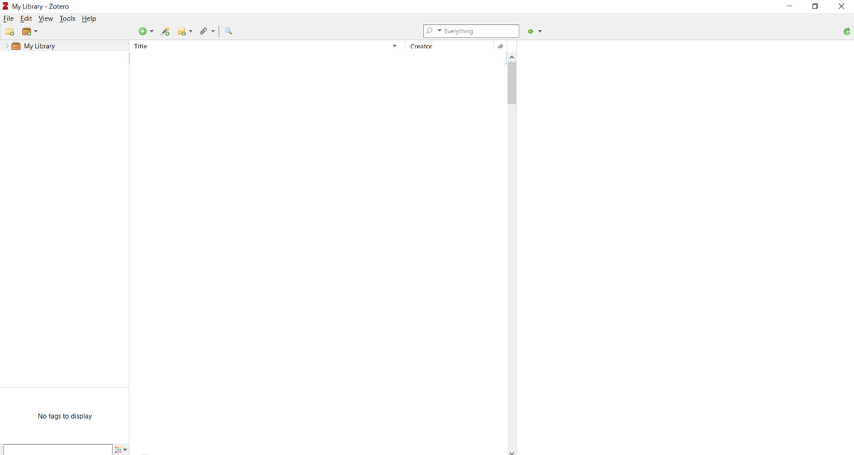
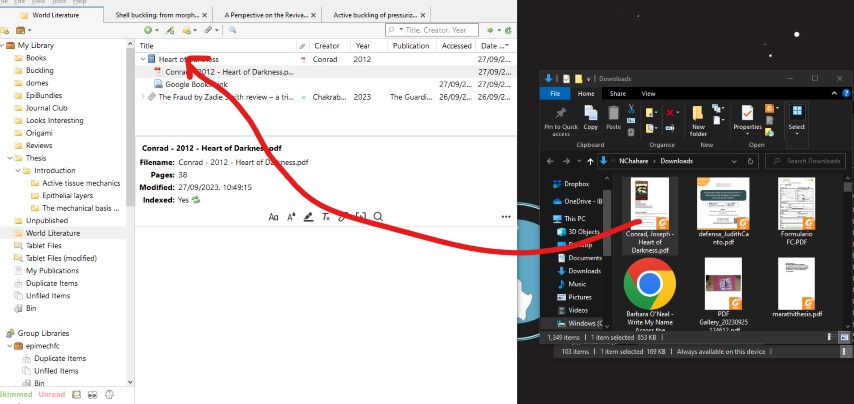
      <li>In your Zotero library, click the circular green arrow to start the sync process.</li>
    </ul>
  </li>
</ol>

<div class="row justify-content-sm-center">
<figure>

  <picture>
    

    <!-- Fallback to the original file -->
    <img src="/assets/img/Pasted%20image%2020231029124616.jpg" class="img-fluid rounded z-depth-1" width="auto" height="auto" title=" " onerror="this.onerror=null; $('.responsive-img-srcset').remove();" />

  </picture>

</figure>

</div>

<h2 id="syncing-your-library-to-a-new-computer">Syncing Your Library to a New Computer</h2>

<p>Once you’ve set up syncing on one computer, you can easily access your Zotero library on another computer.</p>

<ol>
  <li><strong>Login</strong>: On the new computer, log in using your Zotero username and password.</li>
  <li><strong>Instant syncing</strong>: Your references and data will be populated instantly on your new device.</li>
</ol>

<h2 id="managing-file-syncing">Managing File Syncing</h2>

<p>Zotero’s syncing allows you to choose what to sync. It’s important to note that the storage space available on the Zotero server is limited to 300MB, which can be quickly filled if you sync PDFs.</p>

<p>To manage this:</p>

<ol>
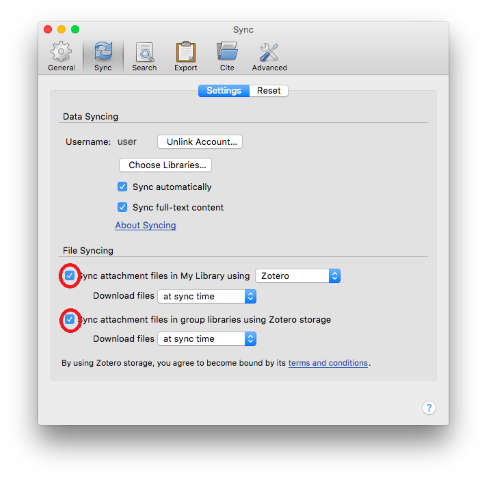
  <li><strong>Data Syncing Only</strong>:
    <ul>
      <li>To conserve space, consider syncing only the data (references, notes, etc.) and not the files (PDFs).</li>
      <li>Uncheck the “File Syncing” option in the Sync preferences.</li>
    </ul>
  </li>
</ol>

<div class="row justify-content-sm-center">
<figure>

  <picture>
    

    <!-- Fallback to the original file -->
    <img src="/assets/img/Pasted%20image%2020231025084203.png" class="img-fluid rounded z-depth-1" width="auto" height="auto" title=" " onerror="this.onerror=null; $('.responsive-img-srcset').remove();" />

  </picture>

</figure>

</div>

<ol>
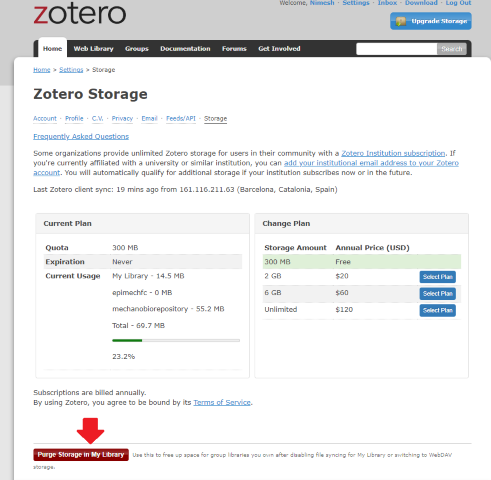
  <li><strong>Checking Your Data Usage</strong>:
    <ul>
      <li>You can check how much data you are using by going to “zotero.org,” logging in, and accessing your storage settings.</li>
    </ul>
  </li>
  <li><strong>Clearing PDF Data</strong>:
    <ul>
      <li>If you’ve mistakenly added too many PDFs, you can press the red button in your Zotero settings to remove the PDF data from the Zotero cloud. You will still retain the PDFs on your device but won’t access them through the web library.</li>
    </ul>
  </li>
</ol>

<div class="row justify-content-sm-center">
<figure>

  <picture>
    

    <!-- Fallback to the original file -->
    <img src="/assets/img/Pasted%20image%2020231029123629.png" class="img-fluid rounded z-depth-1" width="auto" height="auto" title=" " onerror="this.onerror=null; $('.responsive-img-srcset').remove();" />

  </picture>

</figure>

</div>

<h2 id="exploring-zotfile-for-file-syncing">Exploring Zotfile for File Syncing</h2>

<p>Zotero offers 300MB of free storage for basic syncing. If you require more space for syncing your PDF articles without purchasing extra storage, you can use Zotfile, which combines Zotero’s default sync service with an external storage solution, such as OneDrive, Google Drive, or Dropbox.</p>

<h3 id="using-zotfile-for-free-file-syncing">Using Zotfile for Free File Syncing</h3>

<p>Follow these steps to set up Zotfile for file syncing:</p>

<ol>
  <li><strong>Download Zotfile</strong>:
    <ul>
      <li>Visit <a href="http://zotfile.com">zotfile.com</a> to download the Zotfile extension.</li>
    </ul>
  </li>
  <li><strong>Installation</strong>:
    <ul>
      <li>Open Zotero and go to “Tools” &gt; “Add-ons.”</li>
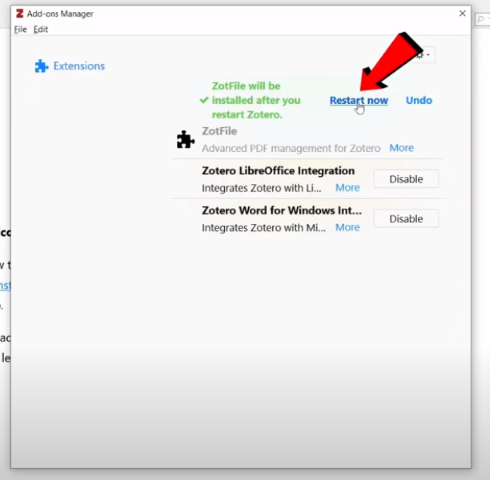
      <li>Drag and drop the Zotero XPI file you downloaded and then install and restart Zotero.</li>
    </ul>
  </li>
</ol>

<div class="row justify-content-sm-center">
<figure>

  <picture>
    

    <!-- Fallback to the original file -->
    <img src="/assets/img/Pasted%20image%2020231029125406.png" class="img-fluid rounded z-depth-1" width="auto" height="auto" title=" " onerror="this.onerror=null; $('.responsive-img-srcset').remove();" />

  </picture>

</figure>

</div>

<ol>
  <li><strong>Set Up Base Directory</strong>:
    <ul>
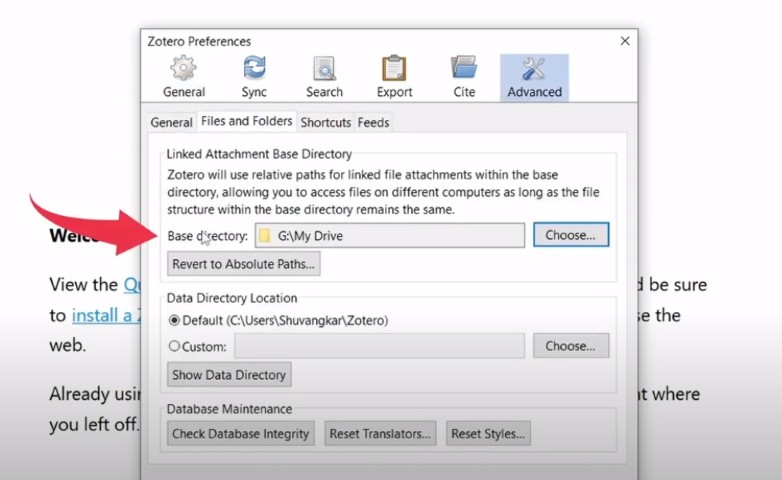
      <li>Go to “Zotero” &gt; “Preferences” &gt; “Advanced” &gt; “Files and Folders.”</li>
      <li>Choose a base directory in your OneDrive (or other cloud storage) where Zotero will store your PDFs. Create a folder and name it “Zoterodb.” For example.</li>
    </ul>
  </li>
</ol>

<div class="row justify-content-sm-center">
<figure>

  <picture>
    

    <!-- Fallback to the original file -->
    <img src="/assets/img/Pasted%20image%2020231029125457.jpg" class="img-fluid rounded z-depth-1" width="auto" height="auto" title=" " onerror="this.onerror=null; $('.responsive-img-srcset').remove();" />

  </picture>

</figure>

</div>

<ol>
  <li><strong>Custom Location</strong>:
    <ul>
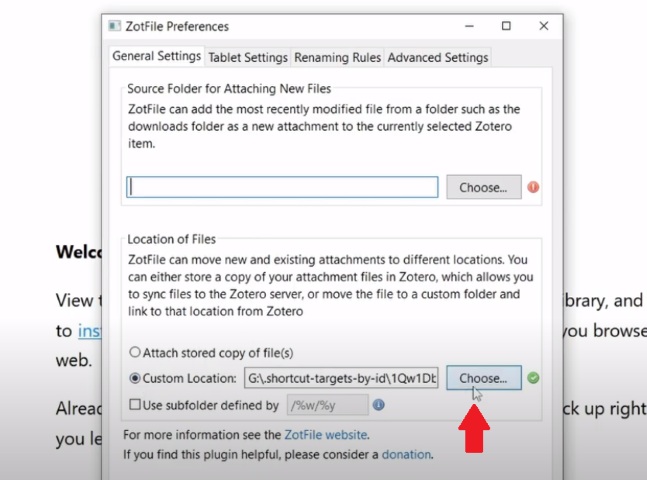
      <li>In “Tools,” go to “ZotFile Preferences” and choose the “Zoterodb” folder as the custom location.</li>
    </ul>
  </li>
</ol>

<div class="row justify-content-sm-center">
<figure>

  <picture>
    

    <!-- Fallback to the original file -->
    <img src="/assets/img/Pasted%20image%2020231029125557.jpg" class="img-fluid rounded z-depth-1" width="auto" height="auto" title=" " onerror="this.onerror=null; $('.responsive-img-srcset').remove();" />

  </picture>

</figure>

</div>

<p>With Zotfile, your PDFs will be automatically renamed and moved to the designated folder in your cloud storage whenever you add a new article.</p>

<p>For your previous articles, select all and right-click, and choose “Manage Attachments,” then rename and move them. This way, all of the articles will be moved into your OneDrive “Zoterodb” folder.</p>

<p>It’s a convenient way to expand your syncing capabilities.</p>

<h2 id="syncing-across-multiple-computers">Syncing Across Multiple Computers</h2>

<p>If you want to access your Zotero library on another computer while using Zotfile, follow these steps:</p>

<ol>
  <li><strong>Log In</strong>:
    <ul>
      <li>Log in to your Zotero sync account, which you set up on your previous computer.</li>
    </ul>
  </li>
  <li><strong>Synchronize Database</strong>:
    <ul>
      <li>Your Zotero database will be synchronized, but keep in mind that this doesn’t include attachment PDFs. You won’t be able to see the PDFs with your articles on the new computer.</li>
    </ul>
  </li>
  <li><strong>Set Up Shared Directory</strong>:
    <ul>
      <li>Install the cloud storage application (e.g., OneDrive) on your new computer.</li>
      <li>Share the “Zoterodb” folder from your previous computer and add it to your new computer. Remember that the folder’s location may be different on both computers.</li>
    </ul>
  </li>
  <li><strong>Configure Base Directory</strong>:
    <ul>
      <li>In Zotero, go to “Preferences” &gt; “Advanced” &gt; “Files and Folders.”</li>
      <li>Set up the base directory, which should be the shared directory on your cloud storage (e.g., OneDrive).</li>
    </ul>
  </li>
  <li><strong>Custom Location</strong>:
    <ul>
      <li>In “Tools,” access “ZotFile Preferences” and select the “Zoterodb” folder as the custom location.</li>
    </ul>
  </li>
</ol>

<p>Now, both of your computers will sync PDFs and attachments, offering a convenient and free way to access your research materials across different devices.</p>

<p>By following these steps, you can make the most of Zotero’s syncing capabilities and ensure that your research library is accessible from anywhere, while efficiently managing your storage space.</p>

<h2 id="references">References</h2>

<ul>
  <li>Zotero help section: <a href="https://www.zotero.org/support/preferences/sync#file_syncing">https://www.zotero.org/support/preferences/sync#file_syncing</a></li>
  <li>Big thanks to this guy for teaching me zotfile. <a href="https://youtu.be/MfFXQ5JYPeA?si=ctgNQkwj_--2ncnF">https://youtu.be/MfFXQ5JYPeA?si=ctgNQkwj_–2ncnF</a></li>
</ul>]]></content><author><name>Nimesh Chahare</name></author><category term="resources" /><summary type="html"><![CDATA[Using zotfile to sync PDFs across multiple devices]]></summary></entry><entry><title type="html">Python: How to do environments</title><link href="https://jexpnimesh.com/2023/10/21/environments.html" rel="alternate" type="text/html" title="Python: How to do environments" /><published>2023-10-21T00:00:00+00:00</published><updated>2023-10-21T00:00:00+00:00</updated><id>https://jexpnimesh.com/2023/10/21/environments</id><content type="html" xml:base="https://jexpnimesh.com/2023/10/21/environments.html"><![CDATA[<h2 id="introduction">Introduction</h2>

<p>People commonly use Conda and Pip to manage their development environments and dependencies.</p>
<ul>
  <li>Conda, a powerful package manager and environment manager, provides a robust solution for creating isolated environments, installing packages, and managing dependencies not only for Python but also for other languages. It’s particularly valuable in data science and scientific computing due to its cross-language support.</li>
  <li>On the other hand, Pip, the Python package manager, is widely used for installing Python-specific packages. Together, Conda and Pip offer a comprehensive toolkit for developers, allowing them to effortlessly set up, manage, and share project-specific environments, making Python development more efficient and reproducible.</li>
</ul>

<h2 id="conda">Conda</h2>

<p>Conda environments in Python are isolated workspaces that allow you to manage project-specific dependencies and isolate packages from your system-wide Python installation. Conda is a package manager and environment manager that provides a powerful way to create, manage, and switch between these environments. Here are the basics of Conda environments in Python:</p>

<ol>
  <li>
    <p><strong>Creating a Conda Environment</strong>:</p>

    <p>You can create a Conda environment using the <code class="language-plaintext highlighter-rouge">conda create</code> command. For example, to create a new environment named “myenv” with a specific Python version (e.g., Python 3.8), you can run:</p>

    <div class="language-bash highlighter-rouge"><div class="highlight"><pre class="highlight"><code>conda create <span class="nt">--name</span> myenv <span class="nv">python</span><span class="o">=</span>3.8
</code></pre></div>    </div>

    <p>This will create an isolated environment with the name “myenv” and install Python 3.8 within it.</p>

    <p>Or you can already have a file telling all the packages in <code class="language-plaintext highlighter-rouge">environment.yml</code></p>
  </li>
</ol>

<div class="language-yaml highlighter-rouge"><div class="highlight"><pre class="highlight"><code><span class="na">name</span><span class="pi">:</span> <span class="s">mycondaenv</span>  <span class="c1"># Name of the Conda environment</span>
<span class="na">channels</span><span class="pi">:</span>       <span class="c1"># Specify Conda channels for package sources</span>
  <span class="pi">-</span> <span class="s">defaults</span>
  <span class="pi">-</span> <span class="s">conda-forge</span>

<span class="na">dependencies</span><span class="pi">:</span>   <span class="c1"># List of package requirements</span>
  <span class="pi">-</span> <span class="s">python=3.9</span>  <span class="c1"># Specify the Python version</span>
  <span class="pi">-</span> <span class="s">numpy=1.21.1</span>
  <span class="pi">-</span> <span class="s">pandas=1.3.1</span>
  <span class="pi">-</span> <span class="s">scikit-learn=0.24.2</span>
  <span class="pi">-</span> <span class="s">jupyter=1.0.0</span>
  <span class="pi">-</span> <span class="s">matplotlib</span>
  <span class="pi">-</span> <span class="s">requests</span>
</code></pre></div></div>

<div class="language-bash highlighter-rouge"><div class="highlight"><pre class="highlight"><code>conda <span class="nb">env </span>create <span class="nt">-f</span> environment.yml
</code></pre></div></div>

<ol>
  <li>
    <p><strong>Activating an Environment</strong>:</p>

    <p>To use an environment, you need to activate it. The activation command depends on your operating system:</p>

    <ul>
      <li>
        <p>On Windows:</p>

        <div class="language-bash highlighter-rouge"><div class="highlight"><pre class="highlight"><code>conda activate myenv
</code></pre></div>        </div>
      </li>
    </ul>

    <p>When an environment is activated, your command prompt or terminal should indicate the environment name, showing that you are working within that environment.</p>
  </li>
  <li>
    <p><strong>Using Packages</strong>:</p>

    <p>You can use Conda to install packages into the active environment. For example, you can install the Pandas library:</p>

    <div class="language-bash highlighter-rouge"><div class="highlight"><pre class="highlight"><code>conda <span class="nb">install </span>pandas
</code></pre></div>    </div>

    <p>This installs the Pandas library within the active environment. Packages installed in one environment do not affect other environments or your system-wide Python installation.</p>
  </li>
  <li>
    <p><strong>Listing Installed Packages</strong>:</p>

    <p>You can list the packages installed in the active environment using the following command:</p>

    <div class="language-bash highlighter-rouge"><div class="highlight"><pre class="highlight"><code>conda list
</code></pre></div>    </div>

    <p>This provides a list of installed packages and their versions.</p>
  </li>
  <li>
    <p><strong>Deactivating an Environment</strong>:</p>

    <p>To exit an environment and return to the base (system-wide) environment, you can deactivate it with the following command:</p>

    <div class="language-bash highlighter-rouge"><div class="highlight"><pre class="highlight"><code>conda deactivate
</code></pre></div>    </div>
  </li>
  <li>
    <p><strong>Exporting and Creating Environment Files</strong>:</p>

    <p>You can export the environment’s configuration to a file using the <code class="language-plaintext highlighter-rouge">conda list --export</code> command. For example:</p>

    <div class="language-bash highlighter-rouge"><div class="highlight"><pre class="highlight"><code>conda list <span class="nt">--export</span> <span class="o">&gt;</span> environment.yml
</code></pre></div>    </div>

    <p>This creates an <code class="language-plaintext highlighter-rouge">environment.yml</code> file, which you can share with others or use to recreate the environment.</p>
  </li>
  <li>
    <p><strong>Creating an Environment from a File</strong>:</p>

    <p>You can create a new environment from an environment file using the <code class="language-plaintext highlighter-rouge">conda env create</code> command. For example:</p>

    <div class="language-bash highlighter-rouge"><div class="highlight"><pre class="highlight"><code>conda <span class="nb">env </span>create <span class="nt">-f</span> environment.yml
</code></pre></div>    </div>

    <p>This command creates a new environment based on the package specifications in the <code class="language-plaintext highlighter-rouge">environment.yml</code> file.</p>
  </li>
</ol>

<p>Conda environments provide a powerful way to manage dependencies and create isolated development environments for different projects. They are particularly useful for data science and scientific computing projects where different projects may require different versions of libraries and tools.</p>

<h4 id="delete-the-conda-environments">Delete the conda environments</h4>

<p>You can delete Conda environments that you no longer need. Deleting environments can help free up disk space and keep your Conda environment list clean. Here’s how to delete a Conda environment:</p>

<ol>
  <li>
    <p><strong>List Your Environments</strong>:</p>

    <p>First, list your Conda environments to see which ones you have. Open your command prompt or terminal and run:</p>

    <div class="language-bash highlighter-rouge"><div class="highlight"><pre class="highlight"><code>conda <span class="nb">env </span>list
</code></pre></div>    </div>

    <p>This will display a list of your Conda environments along with their paths.</p>
  </li>
  <li>
    <p><strong>Deactivate the Environment (if activated)</strong>:</p>

    <p>If the environment you want to delete is currently activated, make sure to deactivate it. You can do this by running:</p>

    <div class="language-bash highlighter-rouge"><div class="highlight"><pre class="highlight"><code>conda deactivate
</code></pre></div>    </div>
  </li>
  <li>
    <p><strong>Delete the Environment</strong>:</p>

    <p>To delete a Conda environment, use the following command, replacing <code class="language-plaintext highlighter-rouge">myenv</code> with the name of the environment you want to delete:</p>

    <div class="language-bash highlighter-rouge"><div class="highlight"><pre class="highlight"><code>conda <span class="nb">env </span>remove <span class="nt">--name</span> myenv
</code></pre></div>    </div>

    <p>If the environment was created in a specific location, you can specify the full path to the environment instead of the name.</p>

    <p><strong>Example for a specific path</strong>:</p>

    <div class="language-bash highlighter-rouge"><div class="highlight"><pre class="highlight"><code>conda <span class="nb">env </span>remove <span class="nt">--prefix</span> /path/to/environment
</code></pre></div>    </div>

    <p><strong>Note</strong>: Deleting an environment is permanent and cannot be undone. Make sure you want to delete the environment before proceeding.</p>
  </li>
</ol>

<p>Once you’ve run the <code class="language-plaintext highlighter-rouge">conda env remove</code> command, the specified environment will be permanently deleted from your system.</p>

<p>Always be careful when deleting environments, especially if they contain important data or configurations. It’s a good practice to back up any critical data or settings before deleting an environment to avoid accidental data loss.</p>

<h2 id="no-conda">No Conda</h2>

<p>You can create and activate Python virtual environments using <code class="language-plaintext highlighter-rouge">venv</code> or <code class="language-plaintext highlighter-rouge">Conda</code>. For example, to create a virtual environment using <code class="language-plaintext highlighter-rouge">venv</code>:</p>

<div class="language-bash highlighter-rouge"><div class="highlight"><pre class="highlight"><code>   python <span class="nt">-m</span> venv myenv
</code></pre></div></div>

<p>To activate the environment:</p>

<div class="language-bash highlighter-rouge"><div class="highlight"><pre class="highlight"><code>   .<span class="se">\m</span>yenv<span class="se">\S</span>cripts<span class="se">\a</span>ctivate
</code></pre></div></div>

<p>Of course things will not work your way! You might get an error.</p>

<p><code class="language-plaintext highlighter-rouge">because running scripts is disabled on this system. For more information, see about_Execution_Policies at https:/go.microsoft.com/fwlink/?LinkID=135170.</code></p>

<p>How to fix this?</p>
<ul>
  <li>Go to powershell and run it as an admin</li>
  <li>Then, check your policy <code class="language-plaintext highlighter-rouge">Get-ExecutionPolicy</code></li>
  <li>It will be restricted, so you change it to not restricted by entering <code class="language-plaintext highlighter-rouge">Set-ExecutionPolicy RemoteSigned</code> and <code class="language-plaintext highlighter-rouge">Y</code></li>
  <li>The <code class="language-plaintext highlighter-rouge">RemoteSigned</code> execution policy allows the execution of scripts that are locally created and signed by a trusted publisher. You can also use other policies based on your security requirements, but <code class="language-plaintext highlighter-rouge">RemoteSigned</code> is a common choice.</li>
  <li>You should now be able to activate the virtual environment using the activation command (e.g., <code class="language-plaintext highlighter-rouge">.\myenv\Scripts\Activate</code>).</li>
  <li>
    <p>After you’ve finished your work with the virtual environment, you can set the execution policy back to its original state or to a more secure setting if needed. To do so, you can use the <code class="language-plaintext highlighter-rouge">Set-ExecutionPolicy</code> command with the desired policy, such as “Restricted” to revert to the default policy.</p>

    <p>To deactivate the environment:</p>

    <div class="language-bash highlighter-rouge"><div class="highlight"><pre class="highlight"><code> deactivate
</code></pre></div>    </div>
  </li>
</ul>

<h4 id="to-delete-environments">To delete environments</h4>

<p><code class="language-plaintext highlighter-rouge">deactivate</code> the environment first</p>

<p>Then, <code class="language-plaintext highlighter-rouge">Remove-Item -Path .\env -Recurse</code></p>

<h4 id="loading-packages-like-environmentyml-but-with-pip">Loading packages like environment.yml but with PIP</h4>

<p>Here’s an example of a <code class="language-plaintext highlighter-rouge">requirements.txt</code> file with Python package requirements:</p>

<div class="language-plaintext highlighter-rouge"><div class="highlight"><pre class="highlight"><code># This is a comment
# You can use comments to provide explanations or notes

# Basic package requirements
numpy&gt;=1.18.5  # Specific version of the NumPy library
pandas&gt;=1.0.1  # Minimum required version of Pandas

# You can use operators to specify version constraints:
# - == for an exact version
# - &gt;= for a minimum version
# - &lt;= for a maximum version

# Additional packages
requests&gt;=2.22.0
matplotlib&gt;=3.2.0
scikit-learn
</code></pre></div></div>

<p>In this example:</p>

<ul>
  <li>Lines starting with <code class="language-plaintext highlighter-rouge">#</code> are comments and are for documentation purposes.</li>
  <li>The <code class="language-plaintext highlighter-rouge">requirements.txt</code> file lists package requirements one per line.</li>
  <li>Package names are followed by optional version constraints to specify the required version. For example, <code class="language-plaintext highlighter-rouge">numpy==1.18.5</code> specifies that version 1.18.5 of NumPy is required, while <code class="language-plaintext highlighter-rouge">pandas&gt;=1.0.1</code> specifies that a minimum version of Pandas 1.0.1 is required.</li>
  <li>You can use operators such as <code class="language-plaintext highlighter-rouge">&gt;=</code>, <code class="language-plaintext highlighter-rouge">&lt;=</code>, and ` == ` to specify version constraints.</li>
  <li>If you don’t specify a version constraint, it means any version can be installed. For example, <code class="language-plaintext highlighter-rouge">scikit-learn</code> is listed without a version constraint, so any compatible version will be installed.</li>
</ul>

<p>Once you have created or obtained a <code class="language-plaintext highlighter-rouge">requirements.txt</code> file, you can use it to install the specified packages or recreate a Python environment with the same package versions by running the following command:</p>

<div class="language-bash highlighter-rouge"><div class="highlight"><pre class="highlight"><code>pip <span class="nb">install</span> <span class="nt">-r</span> requirements.txt
</code></pre></div></div>

<p>This command will read the <code class="language-plaintext highlighter-rouge">requirements.txt</code> file and install the listed packages with their specified versions or constraints.</p>

<p>To create a Python virtual environment based on the requirements listed in a <code class="language-plaintext highlighter-rouge">requirements.txt</code> file, add additional packages to that environment using <code class="language-plaintext highlighter-rouge">pip</code>, and then save the updated requirements to a <code class="language-plaintext highlighter-rouge">requirements.txt</code> file, you can follow these steps:</p>

<p>To create a virtual environment based on these requirements, run the following command:</p>

<div class="language-bash highlighter-rouge"><div class="highlight"><pre class="highlight"><code>python <span class="nt">-m</span> venv myenv  <span class="c"># Create a new virtual environment</span>
.<span class="se">\m</span>yenv<span class="se">\b</span><span class="k">in</span><span class="se">\a</span>ctivate  <span class="c"># Activate the virtual environment</span>
pip <span class="nb">install</span> <span class="nt">-r</span> requirements.txt  <span class="c"># Install the initial package requirements</span>
</code></pre></div></div>

<p>This creates a virtual environment named “myenv” and installs the packages listed in the <code class="language-plaintext highlighter-rouge">requirements.txt</code> file.</p>

<p>Once the virtual environment is activated, you can use <code class="language-plaintext highlighter-rouge">pip</code> to add more packages to it. For example, let’s add the <code class="language-plaintext highlighter-rouge">requests</code> and <code class="language-plaintext highlighter-rouge">beautifulsoup4</code> packages:</p>

<div class="language-bash highlighter-rouge"><div class="highlight"><pre class="highlight"><code>   pip <span class="nb">install </span>requests beautifulsoup4
</code></pre></div></div>

<p>These packages will be installed into the active virtual environment.</p>

<p>To save the updated package requirements, run the following command while still in the virtual environment:</p>

<div class="language-bash highlighter-rouge"><div class="highlight"><pre class="highlight"><code>   pip freeze <span class="o">&gt;</span> updated_requirements.txt
</code></pre></div></div>

<p>This will create a new <code class="language-plaintext highlighter-rouge">updated_requirements.txt</code> file that includes all the packages, both the original ones from <code class="language-plaintext highlighter-rouge">requirements.txt</code> and the additional ones you installed.</p>

<p>Now, you have the <code class="language-plaintext highlighter-rouge">updated_requirements.txt</code> file that reflects the current state of the virtual environment, including the added packages. This file can be shared with others, used for documentation, or to recreate the environment exactly as you have it.</p>

<h2 id="references">References</h2>

<p><a href="https://www.youtube.com/watch?v=1VVCd0eSkYc">https://www.youtube.com/watch?v=1VVCd0eSkYc</a>
Master the basics of Conda environments in Python
Great video to explain conda environment and how to do things</p>]]></content><author><name>Nimesh R. Chahare</name></author><category term="resources" /><summary type="html"><![CDATA[Explanation of envirnonments in Conda and PIP]]></summary></entry><entry><title type="html">Python: How to setup VS code</title><link href="https://jexpnimesh.com/2023/10/20/pythonvscode.html" rel="alternate" type="text/html" title="Python: How to setup VS code" /><published>2023-10-20T00:00:00+00:00</published><updated>2023-10-20T00:00:00+00:00</updated><id>https://jexpnimesh.com/2023/10/20/pythonvscode</id><content type="html" xml:base="https://jexpnimesh.com/2023/10/20/pythonvscode.html"><![CDATA[<h2 id="introduction">Introduction</h2>

<p>I want to standardize things a little bit with vscode. So I am writing this post.</p>

<h3 id="microsoft-vscode">Microsoft vscode</h3>

<p>It’s Free, little bit open source, but owned by Bill Gates. So don’t get use it. So far I like it a lot because of plugins and most importantly it has in built git support.</p>

<h3 id="get-started">Get started</h3>

<ol>
  <li>Install vscode</li>
  <li>Open a folder for your code</li>
  <li>Save the folder as workspace (<code class="language-plaintext highlighter-rouge">File</code> –&gt; <code class="language-plaintext highlighter-rouge">save as workspace</code>)
    Workspace stores all your folders and settings in the file. So next time you can just open the workspace file.</li>
  <li>Download extensions, icon is on the left</li>
</ol>

<h2 id="extensions">Extensions</h2>

<ol>
  <li>
    <p>Python extension pack</p>

    <p>This extension pack packages some of the most popular Python extensions.</p>
    <ul>
      <li><a href="https://marketplace.visualstudio.com/items?itemName=ms-python.python" title="https://marketplace.visualstudio.com/items?itemName=ms-python.python">Python</a> - Linting, Debugging (multi-threaded, remote), Intellisense, code formatting, refactoring, unit tests, snippets, Data Science (with Jupyter), PySpark and more.</li>
      <li><a href="https://marketplace.visualstudio.com/items?itemName=wholroyd.jinja" title="https://marketplace.visualstudio.com/items?itemName=wholroyd.jinja">Jinja</a> - Jinja template language support for Visual Studio Code.</li>
      <li><a href="https://marketplace.visualstudio.com/items?itemName=batisteo.vscode-django" title="https://marketplace.visualstudio.com/items?itemName=batisteo.vscode-django">Django</a> - Beautiful syntax and scoped snippets for perfectionists with deadlines.</li>
      <li><a href="https://marketplace.visualstudio.com/items?itemName=VisualStudioExptTeam.vscodeintellicode" title="https://marketplace.visualstudio.com/items?itemName=VisualStudioExptTeam.vscodeintellicode">Visual Studio IntelliCode</a> - Provides AI-assisted productivity features for Python developers in Visual Studio Code with insights based on understanding your code combined with machine learning..</li>
      <li><a href="https://marketplace.visualstudio.com/items?itemName=donjayamanne.python-environment-manager" title="https://marketplace.visualstudio.com/items?itemName=donjayamanne.python-environment-manager">Python Environment Manager</a> - Provides the ability to view and manage all of your Python environments &amp; packages from a single place.</li>
      <li><a href="https://marketplace.visualstudio.com/items?itemName=njpwerner.autodocstring" title="https://marketplace.visualstudio.com/items?itemName=njpwerner.autodocstring">Python Docstring Generator</a> - Quickly insert Python comment blocks with contextually inferred parameters for classes and methods based on multiple, selectable template patterns.</li>
      <li><a href="https://marketplace.visualstudio.com/items?itemName=KevinRose.vsc-python-indent" title="https://marketplace.visualstudio.com/items?itemName=KevinRose.vsc-python-indent">Python Indent</a> - Correct python indentation in Visual Studio Code.</li>
      <li><a href="https://marketplace.visualstudio.com/items?itemName=ms-toolsai.jupyter" title="https://marketplace.visualstudio.com/items?itemName=ms-toolsai.jupyter">Jupyter</a> - Provides Jupyter notebook support for Python language, used for data science, scientific computing and machine learning.</li>
    </ul>
  </li>
  <li>Pylance: Fast, feature-rich language support for Python (<em>update: they have added this part in the extension pack since this post was written.</em>)</li>
  <li>Jupyter: Notebook for python</li>
  <li>CodeSnap: Lets you take screenshots of code</li>
  <li>Path Intellisense: Visual Studio Code plugin that autocompletes filenames.</li>
</ol>

<h3 id="to-enable-jupyter-style-in-python-vscode-optional">To enable Jupyter style in python vscode (optional)</h3>

<p>Enable this option <code class="language-plaintext highlighter-rouge">settings</code> &gt; <code class="language-plaintext highlighter-rouge">jupyter: send selection to interactive window</code></p>

<p>So Idea is that in vscode you can open the jupyter notebook and run like normal notebook, but what is even better that you get to run the python files like jupyter notebook</p>

<p>By turning on the option, you can open the python file, select the like of code and press <code class="language-plaintext highlighter-rouge">shift + enter</code> . This opens another window which is like jupyter notebook.</p>

<h2 id="install-packages">Install packages</h2>

<p>Easy just use pip, it works and it is simple
<code class="language-plaintext highlighter-rouge">pip install blah</code></p>

<h2 id="references">References</h2>

<p>This guy did a video about it in context of data science, but I found his advice quite nice.
<a href="https://www.youtube.com/watch?v=zulGMYg0v6U">https://www.youtube.com/watch?v=zulGMYg0v6U</a></p>]]></content><author><name>Nimesh R. Chahare</name></author><category term="resources" /><summary type="html"><![CDATA[Just list of extensions needed for python to work well.]]></summary></entry><entry><title type="html">Zotero: Getting started with</title><link href="https://jexpnimesh.com/2023/09/27/zotero1.html" rel="alternate" type="text/html" title="Zotero: Getting started with" /><published>2023-09-27T00:00:00+00:00</published><updated>2023-09-27T00:00:00+00:00</updated><id>https://jexpnimesh.com/2023/09/27/zotero1</id><content type="html" xml:base="https://jexpnimesh.com/2023/09/27/zotero1.html"><![CDATA[<div class="language-plaintext highlighter-rouge"><div class="highlight"><pre class="highlight"><code>This post was explicitly written for my sister
</code></pre></div></div>

<h2 id="what-is-zotero">What is Zotero?</h2>

<p><strong>Zotero</strong> is an app that scholars around the world use to manage their references. References are useful pieces of information from books, articles, videos, or web pages. When academics write something, they need to support it with evidence.</p>

<p>As a scientist myself, when I make a claim or statement, I have to prove it with my own experimental data or “cite” somebody else’s work as a reference. This is called <strong>citation</strong> and <strong>reference</strong>.</p>

<p>Citations are important because they help readers find the original source of information and give credit to the original author. By citing sources, you show that your work is based on reliable and trustworthy information.</p>

<p><strong>Citation example</strong>: Let’s say you are writing an essay and you want to include a quote from a book. You would use a citation to mention the author’s name and the page number where the quote can be found. For example, you might write:</p>
<blockquote>
  <p>“According to Smith (2010), ‘quote goes here’ (p. <a href="https://apastyle.apa.org/style-grammar-guidelines/references/examples">25).” This citation gives credit to the original author and provides evidence for your argument</a></p>
</blockquote>

<p><strong>Reference example</strong>: At the end of your essay, you would include a reference list that provides detailed information about all the sources you cited in your work. For a book, the reference would include the author’s name, publication date, title of the book, and other relevant details. For example:</p>

<blockquote>
  <p>Smith, J. (2010). <em>Book Title</em>. Publisher.</p>
</blockquote>

<p><a href="https://www.scribbr.com/citing-sources/citation-example/">This reference list entry gives readers all the information they need to find the book themselves</a></p>

<p>In addition to managing references, Zotero helps you organize your research sources efficiently. You can create collections, add tags, and easily search for specific items. It also works with word processors like Microsoft Word and Google Docs, making it easy to insert citations and create bibliographies.</p>

<p>Zotero is a powerful tool that can save you time and effort when managing your references. Whether you’re working on an assignment or writing a paper, Zotero can help you stay organized and ensure your references are accurate and properly formatted.</p>

<p><strong>Remember: Zotero is for storing notes and references, not files.</strong> We will talk about this in later section.</p>
<h2 id="how-to-start-with-zotero-as-in-installsign-up">How to start with Zotero as in install/sign up</h2>

<p>Download the software and install it. You can find it on this link: <a href="https://www.zotero.org/">https://www.zotero.org/</a></p>

<div class="row justify-content-sm-center">
<figure>

  <picture>
    

    <!-- Fallback to the original file -->
    <img src="/assets/img/Pasted%20image%2020230926215521.jpg" class="img-fluid rounded z-depth-1" width="auto" height="auto" title="logo of the club" onerror="this.onerror=null; $('.responsive-img-srcset').remove();" />

  </picture>

</figure>

</div>

<p>To use Zotero properly with online resources, you have to have the Zotero browser extension, for web browsers like Google Chrome/Microsoft Edge.</p>

<div class="row justify-content-sm-center">
<figure>

  <picture>
    

    <!-- Fallback to the original file -->
    <img src="/assets/img/Pasted%20image%2020230926215833.jpg" class="img-fluid rounded z-depth-1" width="auto" height="auto" title="logo of the club" onerror="this.onerror=null; $('.responsive-img-srcset').remove();" />

  </picture>

</figure>

</div>

<p>Open Zotero after you have installed it.</p>

<p>Its interface will look something like this 👇</p>

<div class="row justify-content-sm-center">
<figure>

  <picture>
    

    <!-- Fallback to the original file -->
    <img src="/assets/img/Pasted%20image%2020230926215914.png" class="img-fluid rounded z-depth-1" width="auto" height="auto" title=" " onerror="this.onerror=null; $('.responsive-img-srcset').remove();" />

  </picture>

</figure>

</div>

<p>You can use Zotero offline, but for having your notes online, it is better to have a Zotero account.</p>

<p>You can register with a free account here <a href="https://www.zotero.org/user/login/">https://www.zotero.org/user/login/</a></p>

<div class="row justify-content-sm-center">
<figure>

  <picture>
    

    <!-- Fallback to the original file -->
    <img src="/assets/img/Pasted%20image%2020230926220123.png" class="img-fluid rounded z-depth-1" width="auto" height="auto" title=" " onerror="this.onerror=null; $('.responsive-img-srcset').remove();" />

  </picture>

</figure>

</div>

<h2 id="how-to-organize-your-zotero-library">How to Organize Your Zotero Library</h2>

<p>Once you’ve set up Zotero, you can begin organizing your research materials. Follow these steps to create collections and add items:</p>

<h3 id="step-1-create-a-new-collection">Step 1: Create a New Collection</h3>

<ol>
  <li>
    <p>Open the Zotero software.</p>
  </li>
  <li>
    <p>Click on <code class="language-plaintext highlighter-rouge">File</code>, then select <code class="language-plaintext highlighter-rouge">New Collection</code>.</p>
  </li>
  <li>
    <p>Choose a name for your collection that relates to your project, article, dissertation, or whatever you’re working on. For example, in this case, they chose <code class="language-plaintext highlighter-rouge">World Literature</code>.</p>
  </li>
</ol>

<div class="row justify-content-sm-center">
<figure>

  <picture>
    

    <!-- Fallback to the original file -->
    <img src="/assets/img/Pasted%20image%2020230926220753.png" class="img-fluid rounded z-depth-1" width="auto" height="auto" title=" " onerror="this.onerror=null; $('.responsive-img-srcset').remove();" />

  </picture>

</figure>

</div>

<h3 id="step-2-adding-items">Step 2: Adding Items</h3>

<p>There are three different ways to add items to your collection:</p>

<h4 id="1-manual-entry">1. Manual Entry:</h4>

<ul>
  <li>Click on the green plus icon.</li>
  <li>Select the type of item it is, such as an internet article, book, or video.</li>
  <li>Enter the author and title information on the right-hand side. Note that this method can be time-consuming.</li>
</ul>

<div class="row justify-content-sm-center">
<figure>

  <picture>
    

    <!-- Fallback to the original file -->
    <img src="/assets/img/Pasted%20image%2020230926223639.png" class="img-fluid rounded z-depth-1" width="auto" height="auto" title=" " onerror="this.onerror=null; $('.responsive-img-srcset').remove();" />

  </picture>

</figure>

</div>

<h4 id="2-add-by-identifier">2. Add by Identifier:</h4>

<ul>
  <li>Next to the green plus icon, you’ll find another button that allows you to enter ISBNs, DOIs, and more. An <strong>ISBN</strong> is a unique identification number assigned to publications like books and eBooks. It helps identify each publication in the international book trade. However, this method can be less convenient.</li>
</ul>

<h4 id="3-zotero-connector">3. Zotero Connector:</h4>

<ul>
  <li>If you’ve installed the Zotero connector in your web browser, you can easily add articles to Zotero.</li>
  <li>Open Zotero and your web browser (e.g., Google Chrome).</li>
  <li>While browsing, if you come across an article or source you want to save, click on the Zotero button at the top of your browser. The button’s appearance will vary depending on the type of item (e.g., it may look like a newspaper or book).</li>
  <li>Once clicked, Zotero will save the reference and store a snapshot of the webpage.</li>
</ul>

<div class="row justify-content-sm-center">
<figure>

  <picture>
    

    <!-- Fallback to the original file -->
    <img src="/assets/img/Pasted%20image%2020230926225608.jpg" class="img-fluid rounded z-depth-1" width="auto" height="auto" title=" " onerror="this.onerror=null; $('.responsive-img-srcset').remove();" />

  </picture>

</figure>

</div>

<ul>
  <li>You can check your Zotero library to confirm that it’s been added with all the details. You can also access it in the right-side panel for taking notes.</li>
</ul>

<div class="row justify-content-sm-center">
<figure>

  <picture>
    

    <!-- Fallback to the original file -->
    <img src="/assets/img/Pasted%20image%2020230926230121.jpg" class="img-fluid rounded z-depth-1" width="auto" height="auto" title=" " onerror="this.onerror=null; $('.responsive-img-srcset').remove();" />

  </picture>

</figure>

</div>

<p>With these steps, you can efficiently organize and manage your research materials in Zotero. Happy researching! 📚🔍</p>

<h2 id="how-to-add-a-novel-pdf-to-zotero">How to Add a Novel PDF to Zotero</h2>

<p>If you want to keep track of the novels you’re reading in PDF format using Zotero, you’re in luck! It’s quite straightforward. Let’s walk through it step by step with an example using the novel “Heart of Darkness” by Joseph Conrad.</p>

<h3 id="drag-and-drop-the-pdf">Drag and Drop the PDF</h3>

<ol>
  <li>
    <p>First, locate the PDF file of the novel you want to add. In our case, it’s “Heart of Darkness.”</p>
  </li>
  <li>
    <p>Open Zotero and have it ready on your screen.</p>
  </li>
  <li>
    <p>Simply drag and drop the PDF file into the Zotero window.</p>
  </li>
</ol>

<div class="row justify-content-sm-center">
<figure>

  <picture>
    

    <!-- Fallback to the original file -->
    <img src="/assets/img/Pasted%20image%2020230927105023.jpg" class="img-fluid rounded z-depth-1" width="auto" height="auto" title=" " onerror="this.onerror=null; $('.responsive-img-srcset').remove();" />

  </picture>

</figure>

</div>

<h3 id="review-auto-detected-information">Review Auto-Detected Information</h3>

<p>Zotero will try to automatically detect the author and title of the book. It will create an item for you. You can see this information displayed.</p>

<div class="row justify-content-sm-center">
<figure>

  <picture>
    

    <!-- Fallback to the original file -->
    <img src="/assets/img/Pasted%20image%2020230927105320.jpg" class="img-fluid rounded z-depth-1" width="auto" height="auto" title=" " onerror="this.onerror=null; $('.responsive-img-srcset').remove();" />

  </picture>

</figure>

</div>

<p>If Zotero gets it right, great! If not, don’t worry, we can fix it.</p>

<h3 id="the-best-way--find-the-book-on-google-books">The Best Way – Find the Book on Google Books</h3>

<ol>
  <li>
    <p>Open your web browser and go to <a href="https://books.google.com/">https://books.google.com/</a>.</p>
  </li>
  <li>
    <p>Use the search bar to find the book. In our example, we’re searching for “Joseph Conrad Heart of Darkness.”</p>
  </li>
  <li>
    <p>When you find the correct book, click on it.</p>
  </li>
</ol>

<div class="row justify-content-sm-center">
<figure>

  <picture>
    

    <!-- Fallback to the original file -->
    <img src="/assets/img/Pasted%20image%2020230927105928.jpg" class="img-fluid rounded z-depth-1" width="auto" height="auto" title=" " onerror="this.onerror=null; $('.responsive-img-srcset').remove();" />

  </picture>

</figure>

</div>

<h3 id="import-book-information">Import Book Information</h3>

<ol>
  <li>Once you’re on the book’s page, look for a book icon. Click on it.</li>
</ol>
<div class="row justify-content-sm-center">
<figure>

  <picture>
    

    <!-- Fallback to the original file -->
    <img src="/assets/img/Pasted%20image%2020230927110042.jpg" class="img-fluid rounded z-depth-1" width="auto" height="auto" title=" " onerror="this.onerror=null; $('.responsive-img-srcset').remove();" />

  </picture>

</figure>

</div>

<ol>
  <li>Now, Zotero will import all the correct details about the book.</li>
</ol>
<div class="row justify-content-sm-center">
<figure>

  <picture>
    

    <!-- Fallback to the original file -->
    <img src="/assets/img/Pasted%20image%2020230927110224.jpg" class="img-fluid rounded z-depth-1" width="auto" height="auto" title=" " onerror="this.onerror=null; $('.responsive-img-srcset').remove();" />

  </picture>

</figure>

</div>
<h3 id="clean-up-duplicate-entries">Clean Up Duplicate Entries</h3>

<p>Sometimes, you might have multiple items for the same book. To keep things organized:</p>

<ol>
  <li>
    <p>Right-click on the incorrect item(s) and select “Move item to bin” to delete them.</p>
  </li>
  <li>
    <p>Finally, drag your PDF file onto the correct item in Zotero to link it to the book.</p>
  </li>
</ol>
<div class="row justify-content-sm-center">
<figure>

  <picture>
    

    <!-- Fallback to the original file -->
    <img src="/assets/img/Pasted%20image%2020230927112605.jpg" class="img-fluid rounded z-depth-1" width="auto" height="auto" title=" " onerror="this.onerror=null; $('.responsive-img-srcset').remove();" />

  </picture>

</figure>

</div>

<p>That’s it! You’ve successfully added a novel PDF to Zotero while keeping your library tidy and well-organized. Happy reading and note-taking! 📚📝</p>

<h2 id="pending">Pending</h2>

<p>I will write about the following topics later:
<strong>How to cite with Zotero</strong></p>

<p><strong>How to keep Zotero syncing online with Zotfile</strong></p>

<h2 id="references">References</h2>

<p>Zotero’s quick guide
https://www.zotero.org/support/quick_start_guide</p>

<p>McGill University tutorial
https://youtu.be/M2wsGCqavPI?si=e8qgXUVykwbgB5tu</p>

<p>Mustaq Bilal’s great Zotero Meta thread
https://x.com/MushtaqBilalPhD/status/1572880223150153730?s=20</p>]]></content><author><name>Nimesh Chahare</name></author><category term="resources" /><summary type="html"><![CDATA[How to use zotero at the most basic level]]></summary></entry><entry><title type="html">Tweeting Epithelial Mechanics</title><link href="https://jexpnimesh.com/2023/09/11/epimechfc.html" rel="alternate" type="text/html" title="Tweeting Epithelial Mechanics" /><published>2023-09-11T00:00:00+00:00</published><updated>2023-09-11T00:00:00+00:00</updated><id>https://jexpnimesh.com/2023/09/11/epimechfc</id><content type="html" xml:base="https://jexpnimesh.com/2023/09/11/epimechfc.html"><![CDATA[<h2 id="background">Background</h2>

<p>Near the end of my Ph.D., I noticed something interesting on Twitter. Many accounts were popping up, sharing the latest research papers in fields like Soft Matter and Cell Biology. I thought it seemed cool and doable. I was using Zotero’s RSS feeds to stay updated on papers, so I thought, “Why not start my own account?”</p>

<p>But, as often happens, things that seem easy can turn out to be tough.</p>

<p>I had a simple idea: create a Twitter account about epithelial mechanics, similar to the Cell Biology Journal Club or Soft Matter Fan Club. But I didn’t want it to be one-way. I wanted a real community where people could discuss epithelial mechanics and share the latest research. I also wanted to connect with experts in the field, especially because I was searching for a postdoc position. I already had a list of labs in mind whose Twitter accounts I could follow and share papers from.</p>

<p>I also considered making informative Twitter threads about different aspects of epithelial mechanics. I had plenty of references from my thesis, all nicely organized. I thought, “I’m pretty knowledgeable, so why not share these and do some science communication?” Additionally, I thought about reaching out to experts in the field and asking them to share papers for these threads. I even imagined it could lead to an online community with articles and online/offline conferences. But then, life got busy with lab work, postdoc applications, and research papers, and I forgot all about it.</p>

<p>It was always on my mind, but it wasn’t until one summer weekend, as I lay on the beach, that I decided to take the plunge. I created the “Epithelial Mechanics Fan Club” Twitter account. My plan was straightforward: share one research paper every day and occasionally dive into specific topics with Twitter threads. And just like that, I found myself dreaming once more about creating an incredible international community.</p>

<p>I had no idea that this simple decision would start an exciting journey. I began building an online hub for fellow fans of epithelial mechanics.</p>

<h2 id="fan-club">Fan club</h2>

<div class="row justify-content-sm-center">
<figure>

  <picture>
    

    <!-- Fallback to the original file -->
    <img src="/assets/img/epimechfc.png" class="img-fluid rounded z-depth-1" width="auto" height="auto" title="logo of the club" onerror="this.onerror=null; $('.responsive-img-srcset').remove();" />

  </picture>

</figure>

</div>
<p><br />
I even made the cartoon for the profile picture 
<br /></p>

<p>The journey began when I launched the account and kicked things off with an engaging thread on the etymology of epithelia. I urged people to join the account, even attempting to promote the tweet from my personal account. I’ll admit, at first, I was a bit embarrassed to publicly admit that I was behind this “club.” I had this fear that it might come off as uncool to have such a thing, and quitting would be even less cool. I remained anonymous.</p>

<p>https://twitter.com/EpiMechFC/status/1683131495379087360?s=20</p>

<p>In the beginning, tweeting was a breeze. I had my PubMed RSS feed for epithelial mechanics, so all I had to do was tweet away. But soon, I realized that the papers appearing weren’t all that interesting, and, more importantly, they weren’t as relevant as I’d hoped, despite having the right keywords.</p>

<p>Two major issues started to plague me. Firstly, I was constantly anxious about what to tweet and what people would think. I worried that if people found the papers boring, they’d think the account was pointless. Secondly, I became obsessed with getting likes and followers. To grab attention, I’d tweet a paper and then follow the corresponding lab on Twitter.</p>

<p>I had around 25 followers, and it felt like nobody really cared about the account. Especially the people I was trying to catch the eye of—they weren’t following me either. Coming up with thread ideas felt overwhelming, and it was eating into my precious time outside the lab. I found myself scrolling Twitter while having meals, counting every like and follow.</p>

<p>Eventually, I decided to manage my Twitter time better. I scheduled all the week’s papers on Sundays and limited my daily Twitter time to 30 minutes. This led me to discover a bunch of automation tools like buffer.com and zapier. I even attempted to learn how to use the Twitter API and tried tracking activity to see if anyone used EpimechFC on TweetDeck.</p>

<p>I stuck to some basic rules: tweet every day and do threads every now and then. My first thread boosted my followers to 50, and when I tweeted a second thread, it shot up to 250. The account attracted more quality followers as the network expanded. My rationale was simple: good followers meant people with lots of followers themselves. The idea was that if they engaged with my tweets, visibility would increase, and I’d gain more followers.</p>

<p>https://twitter.com/EpiMechFC/status/1700870413012656479?s=20</p>

<p>With this surge in followers, I reached out to a few folks, like young PIs and postdocs, to collaborate on threads. Dishearteningly, I discovered that people weren’t keen on talking to random internet strangers, let alone doing work for free. So, I leaned on connections I’d built over the years. Luckily, some agreed. I dubbed them “delegates.” One Swiss delegate crafted a fantastic thread about how cells react to mechanical forces, which generated an excellent response. Many liked it, and our followers grew to 400. I’m thrilled and proud to have a thriving Twitter account, and I even made a post inviting everyone to join the International Epithelial Mechanics Fan Club. Revealing myself as the “convenor” of the club.</p>

<p>https://twitter.com/onenimesa/status/1701146599743689025?s=20</p>

<h2 id="x-woes">X woes</h2>

<p>Nowadays, I’m feeling a bit less stressed because I’ve managed to build a pretty decent account, and it actually has more followers than my personal one. But make no mistake, it’s still a lot of work, and I can’t help but feel a bit anxious at times, worried that I won’t be able to keep it up.</p>

<p>One thing that strikes me is that, despite threads bringing in more followers, only a few people actually end up viewing the research papers. Typically, I start a thread with an initial tweet asking a question, followed by mentioning to check out the next 5 papers related to a particular topic. The statistics show that most people see the first tweet, but only about 1/10th of them proceed to the second tweet, and this engagement decreases as the thread continues.</p>

<div class="row justify-content-sm-center">
<figure>

  <picture>
    

    <!-- Fallback to the original file -->
    <img src="/assets/img/tweetgraph.png" class="img-fluid rounded z-depth-1" width="auto" height="auto" title="logo of the club" onerror="this.onerror=null; $('.responsive-img-srcset').remove();" />

  </picture>

</figure>

</div>
<p><br />
The graph of impressions of the tweets with respect to position in the thread
<br /></p>

<p>Anyways, thousand people seeing the paper and ten people bookmarking is a great success for me.</p>

<p>As I jot this down in mid-2023, Elon Musk has been messing around with Twitter—or should I say, “X,” as it’s now known. Tweets have become “posts,” and the iconic bird logo is a thing of the past. What’s more, the cool features of TweetDeck have gone premium. I’ve also heard that link previews are going away, and Twitter is not being very friendly to tweets with external links. That’s a bit of a bummer because this account is all about promoting science and research papers, which means lots of external links.</p>

<p>At my lowest moments, I find myself thinking it would be kind of nice if Elon Musk asked for money to keep up the account. Then I’d have the perfect excuse to tell the world that it was great while it lasted, but I can’t keep it going because I’ve got to pay Elon Musk. I’d quit Twitter like many others have done since he took over.</p>

<p>However, I’m going to keep at it for as long as I can or until I find someone who’s willing to take over. It’s been an amazing experience, and it only gets better when someone from the internet says nice things about what you’re doing.</p>

<p>https://twitter.com/fabrice_senger/status/1700200097387024400?s=20</p>]]></content><author><name>Nimesh Chahare</name></author><category term="memories" /><summary type="html"><![CDATA[My experience with making a twitter account about epithelial mechancis]]></summary></entry><entry><title type="html">Italian phrasebook</title><link href="https://jexpnimesh.com/2023/08/22/italian.html" rel="alternate" type="text/html" title="Italian phrasebook" /><published>2023-08-22T00:00:00+00:00</published><updated>2023-08-22T00:00:00+00:00</updated><id>https://jexpnimesh.com/2023/08/22/italian</id><content type="html" xml:base="https://jexpnimesh.com/2023/08/22/italian.html"><![CDATA[<p>I had an exciting trip planned to Italy, with stops in Rome, Florence, Pisa, and a wedding in a charming village in Tuscany. I thought it would be nice to speak a little Italian while traveling around the country. I’ve always had this nagging feeling that I could be much cooler if I could speak multiple languages fluently. Many of my European friends effortlessly spoke four to six languages, while in India, people typically mastered three: Hindi, English, and their regional language, in my case, Marathi.</p>

<p>But I must confess, I’m a bit lazy when it comes to learning languages. My past attempts at becoming multilingual were not very successful. I had completely given up on Spanish and struggled with Catalan during my PhD, with disastrous results in my tests. However, I somehow managed to pick up and maintain a decent B1 level of Catalan, just enough to earn the respect of Catalan-speaking folks. The best part is when I tell them I only speak Catalan, not Spanish – their reactions are priceless.</p>

<p>I have a friend who has the remarkable skill of memorizing words and phrases in various languages. He delivers them so convincingly that you’d think he’s a native speaker. Inspired by him, I decided to gather basic Italian words and phrases, memorize them, and start using them during my trip. Even if I could learn just a few sentences, it would make me happy.</p>

<p>What I’ve discovered is that people genuinely appreciate it when you make an effort to speak their language (except, perhaps, for the French, who have a reputation for their strict language standards). They don’t mind if you make mistakes – what matters is the genuine attempt.</p>

<p>So, my journey began with the quest for a list of basic Italian words and phrases. I scoured the internet, compiled a list of common verbs, nouns, and phrases, and created a CSV file. Then, I turned to ChatGPT to translate them all into Italian.</p>

<p>The exciting part was that Italian and Catalan share some similarities, which made it easier for me to pick up vocabulary and understand sentence construction. This gave me a boost of confidence and motivation.</p>

<p>I put together the list, and you can check it out on my Notion page: <a href="https://ncupc.notion.site/24130cbfb0964dfbb82df699a539f1a5?v=168af50c2e04476492f5d0c40e966daf&amp;pvs=4">link</a>. It’s not comprehensive, but it should at least enable me to have conversations and navigate simple interactions during my travels.</p>

<p>Best part of the page is that I can always expand it to add new words, and also I could use it to learn another “language”. I just need to translate the English column into whatever language column.</p>

<p>Now, the real test will be whether I actually get to use this phrasebook during my Italian adventure. Fingers crossed!</p>

<div class="row justify-content-sm-center">
<figure>

  <picture>
    

    <!-- Fallback to the original file -->
    <img src="/assets/img/italian.jpg" class="img-fluid rounded z-depth-1" width="auto" height="auto" title="Italian webpage" onerror="this.onerror=null; $('.responsive-img-srcset').remove();" />

  </picture>

</figure>

</div>
<p><br />
<a href="https://ncupc.notion.site/24130cbfb0964dfbb82df699a539f1a5?v=168af50c2e04476492f5d0c40e966daf&amp;pvs=4">Notion webpage link</a></p>]]></content><author><name>Nimesh Chahare</name></author><category term="notes" /><summary type="html"><![CDATA[List of words and phrases to learn any new language]]></summary></entry><entry><title type="html">How I Learned to Stop Worrying and deal with X.com</title><link href="https://jexpnimesh.com/2023/08/07/mutedwords.html" rel="alternate" type="text/html" title="How I Learned to Stop Worrying and deal with X.com" /><published>2023-08-07T00:00:00+00:00</published><updated>2023-08-07T00:00:00+00:00</updated><id>https://jexpnimesh.com/2023/08/07/mutedwords</id><content type="html" xml:base="https://jexpnimesh.com/2023/08/07/mutedwords.html"><![CDATA[<p>X, formerly known as Twitter, is the only social media I use. I enjoy keeping up with scientific developments and following scientists from around the world to see what they’re up to.</p>

<p>In these turbulent times, I rely on traditional news sources to stay informed rather than Twitter/X.</p>

<p>It’s not surprising that scientists, like everyone else, can sometimes have less-than-ideal opinions about the news. Typically, I simply ignore them. However, if someone becomes particularly annoying or overzealous in their tweeting, I might resort to blocking, unfollowing, or muting them.</p>

<p>Interestingly, thanks to Elon Musk (<em>sarcasm</em>), I’ve stumbled upon the useful feature of muted keywords. You can access it through this link: 
<a href="https://twitter.com/settings/muted_keywords">https://twitter.com/settings/muted_keywords</a>. 
It allows you to filter out tweets containing specific words.</p>

<p>If you are on the phone go to settings –&gt; Privacy and Safety –&gt; Mute and block –&gt; Muted words.</p>

<p>I strongly encourage people to take advantage of this feature by muting keywords they’d rather not see in their feed. With all the strife and misery in the world, there’s no need to clutter up Twitter with negativity when we already have the news for that.</p>

<p>As an example, I’m a 30-year-old Indian man, and Twitter seems to think I’m inherently interested in cricket, cricketers, and their personal lives. To address this, I’ve added the necessary keywords to filter out these tweets. It’s been remarkably effective!</p>

<p>I wish you have a wonderful day!</p>]]></content><author><name>Nimesh Chahare</name></author><category term="notes" /><summary type="html"><![CDATA[Block words from twitter]]></summary></entry><entry><title type="html">VS code: how to do LaTeX</title><link href="https://jexpnimesh.com/2023/08/02/vscode-latex.html" rel="alternate" type="text/html" title="VS code: how to do LaTeX" /><published>2023-08-02T00:00:00+00:00</published><updated>2023-08-02T00:00:00+00:00</updated><id>https://jexpnimesh.com/2023/08/02/vscode-latex</id><content type="html" xml:base="https://jexpnimesh.com/2023/08/02/vscode-latex.html"><![CDATA[<p>Latex is a useful program for making nice documents. I use it to prepare my CV, letters, research statements, and most importantly, my PhD and Masters thesis. Yeah! Yeah! I know Word is better for sharing and collaborating; Now people are even using Google Docs. What a world! The other day, an undergrad remarked to me, “You use MS Word? That’s for older people! Yes, you are old.”</p>

<p>Anyways, It’s true sometimes you will spend way too much time to on fixing figure caption alignment than in any other program, but I must say it is worth it. Documents look good! You can say its a small price you pay for beauty.</p>

<p><strong>Choosing the editor</strong>: Some people are using Overleaf for compiling documents online. It works for smaller documents. However, I always recommend people to run their code and programs locally. Don’t need to send your data to random companies on internet. I found the best way of using Latex is by using it in VSCode.</p>

<p><strong>Procedure</strong>: Just download and install the VSCode. Then install MiKTeX. MiKTeX, is a lighter installation of Latex. While installing, select the option of “Yes” to install packages on the fly. After the installation of MiKTeX, open the console and check for updates. If everything is up to date. You can move on to downloading and installing Strawbery Perl.  After all programs are installed, open VSCode go to the extensions tab, and then install the “LateX Workshop” extension.</p>

<p>Then you are ready! Just write some document in tex or find some latex repository template on the internet. When you open the document in VSCode, you will see that the LateX workshop extension is able to detect the tex code, and on the left, there is an extra tab for tex. You can select the option to build the document. You can view the pdf. You can even select the option for clearing auxiliary files.</p>

<p>All works well! You can see the status of your build on the bottom-left panel. If you want to go back and forth between pdf and code, use <code class="language-plaintext highlighter-rouge">ctrl</code> + <code class="language-plaintext highlighter-rouge">click</code>.</p>

<p>I like VSCode because it is very well integrated in my workflow for git and version control.</p>

<p><strong>References</strong>: I just watched this <a href="https://www.youtube.com/watch?v=4lyHIQl4VM8">video</a> by Fedrico. Also this <a href="https://mark-wang.com/blog/2022/latex/">blog</a> gave good tips</p>]]></content><author><name>Nimesh Chahare</name></author><category term="notes" /><summary type="html"><![CDATA[How to run LaTeX in Visual Studio Code]]></summary></entry><entry><title type="html">Awesome lists for awesome things!</title><link href="https://jexpnimesh.com/2023/07/15/awesome.html" rel="alternate" type="text/html" title="Awesome lists for awesome things!" /><published>2023-07-15T00:00:00+00:00</published><updated>2023-07-15T00:00:00+00:00</updated><id>https://jexpnimesh.com/2023/07/15/awesome</id><content type="html" xml:base="https://jexpnimesh.com/2023/07/15/awesome.html"><![CDATA[<h1 id="awesome-lists">awesome lists</h1>

<p>This is one of the most useful resources I’ve come across on the internet. I was searching for open-source apps for my phone. While browsing YouTube videos and blogs, I noticed many listicles and articles featuring mediocre apps or worse, paid ones. However, somehow I stumbled upon a GitHub page with a simple bullet-point list of the apps I needed. It was even subdivided into different categories. It was an “aha!” moment.</p>

<p>I then discovered that there’s a whole community behind these lists. Everyone creates their own and shares them online. There are websites that curate lists of lists. It’s fantastic. <a href="https://github.com/sindresorhus/awesome">Check this one</a> or <a href="https://www.trackawesomelist.com/">this one</a> or just check <a href="https://github.com/topics/awesome"><em>awesome</em> topic on Github</a>.</p>

<p>You can find these lists for many useful topics. Instead of wasting time on search engines, you can find an “awesome” list for that subject and directly learn what you need.</p>

<p>It’s not an end-all solution, but it gets you started. I may have spent too much time on these lists not on search results; and I’ve learned a lot. I want to share some of the lists I really appreciated.</p>

<ul>
  <li><a href="https://github.com/pluja/awesome-privacy">Awesome privacy</a> - This is where I really got concerned about my privacy.</li>
  <li><a href="https://github.com/hallvaaw/awesome-biological-image-analysis#readme">Awesome biological image analysis</a> - Biology people working with microscopy data must scan through this page.</li>
  <li><a href="https://github.com/Igglybuff/awesome-piracy">Awesome piracy</a> - I think it has all you need in life for entertainment. Also check out fmhy.net</li>
  <li><a href="https://github.com/tayllan/awesome-algorithms">Awesome algorithms</a> - Incredible resource for learning algorithms.</li>
  <li><a href="https://sr.ht/~jamesponddotco/awesome-privacy-front-ends/">Awesome alternative frontends</a> - I almost stopped using Youtube after this.</li>
  <li><a href="https://github.com/aviaryan/awesome-no-login-web-apps#readme">Awesome no loggin web apps</a> - It’s super useful!!!</li>
</ul>]]></content><author><name>Nimesh Chahare</name></author><summary type="html"><![CDATA[awesome lists]]></summary></entry><entry><title type="html">Python: Terminal things for VScode</title><link href="https://jexpnimesh.com/2023/06/21/terminal.html" rel="alternate" type="text/html" title="Python: Terminal things for VScode" /><published>2023-06-21T00:00:00+00:00</published><updated>2023-06-21T00:00:00+00:00</updated><id>https://jexpnimesh.com/2023/06/21/terminal</id><content type="html" xml:base="https://jexpnimesh.com/2023/06/21/terminal.html"><![CDATA[<p><strong>Command pallete for vscode</strong>:
The Command Palette in Visual Studio Code allows you to search for and execute various commands, including opening files, running tasks, installing extensions, and more, making it a versatile tool for controlling and navigating through the IDE. You can quickly access the Command Palette in Visual Studio Code by pressing <code class="language-plaintext highlighter-rouge">Ctrl</code> + <code class="language-plaintext highlighter-rouge">Shift</code> + <code class="language-plaintext highlighter-rouge">P</code>.</p>

<p><strong>Open the Integrated Terminal</strong>:
To open the integrated terminal in VS Code, press <code class="language-plaintext highlighter-rouge">Ctrl</code> + <code class="language-plaintext highlighter-rouge">`</code> (backtick) on your keyboard. Alternatively, you can go to the menu and select <code class="language-plaintext highlighter-rouge">View</code> &gt; <code class="language-plaintext highlighter-rouge">Terminal</code>.</p>

<p><strong>Running Python Scripts</strong>:
You can run Python scripts by navigating to the directory where your script is located in the terminal and then using the <code class="language-plaintext highlighter-rouge">python</code> command followed by the script name:
<code class="language-plaintext highlighter-rouge">python script.py</code></p>

<p><strong>Starting an Interactive Python Session (Don’t do it)</strong>:
To start an interactive Python session (Python REPL), simply type <code class="language-plaintext highlighter-rouge">python</code> in the terminal: <code class="language-plaintext highlighter-rouge">python</code>
This allows you to run Python commands interactively.
To exit: <code class="language-plaintext highlighter-rouge">exit()</code></p>

<p><strong>Installing Packages with <code class="language-plaintext highlighter-rouge">pip</code></strong>:
You can use <code class="language-plaintext highlighter-rouge">pip</code> to install Python packages directly from the terminal:</p>
<div class="language-bash highlighter-rouge"><div class="highlight"><pre class="highlight"><code>pip <span class="nb">install </span>package_name
</code></pre></div></div>
<p>Replace <code class="language-plaintext highlighter-rouge">package_name</code> with the name of the package you want to install.</p>

<p><strong>Running Jupyter Notebook</strong>:
If you have Jupyter Notebook installed in your environment, you can launch it from the terminal: <code class="language-plaintext highlighter-rouge">jupyter notebook</code></p>

<p><strong>Clearing the Terminal</strong>:
You can clear the terminal screen with the <code class="language-plaintext highlighter-rouge">cls</code> command</p>]]></content><author><name>Nimesh R. Chahare</name></author><category term="resources" /><summary type="html"><![CDATA[Command pallete for vscode: The Command Palette in Visual Studio Code allows you to search for and execute various commands, including opening files, running tasks, installing extensions, and more, making it a versatile tool for controlling and navigating through the IDE. You can quickly access the Command Palette in Visual Studio Code by pressing Ctrl + Shift + P.]]></summary></entry><entry><title type="html">Thesis in Marathi</title><link href="https://jexpnimesh.com/2023/05/17/marathithesis.html" rel="alternate" type="text/html" title="Thesis in Marathi" /><published>2023-05-17T00:00:00+00:00</published><updated>2023-05-17T00:00:00+00:00</updated><id>https://jexpnimesh.com/2023/05/17/marathithesis</id><content type="html" xml:base="https://jexpnimesh.com/2023/05/17/marathithesis.html"><![CDATA[<p>Completing my PhD in Barcelona was a significant achievement and I wanted to share this with my parents, but the visa situation prevented my parents from being there for my defense. Determined to include them in this milestone, I decided to write a summary of my research in Marathi, their native language.</p>

<p>Writing in Marathi after so long, especially about science, was a challenge. I also had no idea how to type in Marathi. A friend suggested using Google Translate, which converted English phonetics into Marathi script. It was a lifesaver.</p>

<p>However, translating scientific terms was tough. My higher education had been in English, and my vocabulary of Marathi lacked the precise terms for cells and tissues. So, I crafted the article especially for my parents, ensuring clarity, using bit of english.</p>

<p>After hours of writing, editing, and revisions, I presented the Marathi summary to my parents. Their reaction was heartwarming. They appreciated the effort and were genuinely proud of my work.</p>

<p>This experience taught me that language should never hinder sharing our achievements and emotions with our loved ones.</p>

<p>You can find the digital copy of the article in the following link:</p>
<embed src="/assets/pdf/marathithesis.pdf" width="500" height="600" type="application/pdf" />]]></content><author><name>Nimesh Chahare</name></author><category term="article" /><summary type="html"><![CDATA[A part of my thesis written in Marathi for my parents]]></summary></entry></feed>